Git as debugging tool
Are you sure? Debugging with Git?
What are the tools that comes on your mind when someone say “debug”? Let me guess:
- a memory leak detector (e.g. Valgrind);
- a profiler (e.g. GNU gprof);
- a function that stops your program and gives you a REPL (e.g. Python’s breakpoint and Ruby’s byebug);
- something that we call a “debugger” (like GDB, or something similar embedded on the IDEs);
- or even our old friend, the print function.
So, in this text I’ll try to convince you to add Git to your debug toolbelt.
When you are versioning some code with Git, the repository is a precious source
of information. A lot of people only think of it as the command that they use to
git add, git commit and finally git push their work the same way as they
upload a file to Google Drive or post a photo on Instagram. However, as Git
keeps the whole history of commits since the oldest one, it is perhaps the tool
that knows the most of the code. Every version of every file is stored in the
repository (in this text I’m referring the local repository as “repository”, not
the GitHub, GitLab, Bitbucket, etc repository), and it’s a work of archaeology
to find useful information in there.
So, I’ll show here some useful concepts and tools to extract everything you need from there!
Git basics recap
Before we go on, let’s first recap the Git basics.
Commits are the “versions” of a repository. They are snapshots, not
deltas, that means that a commit doesn’t know what has changed. Instead, a
commit stores the content of every file. When you run git show, you are
not showing the content of a commit, you are showing a patch, the change in
relation to its parent. That storage, however, is done in a clever way in
order to save space.
Commits have references to their parent commits:
- one parent in a normal commit;
- two parents in a merge commit;
- two or more parents in a octopus merge commit;
- no parents if it’s a initial commit.
Commits also stores when and who created them!
Branches are only references to commits. In fact, a branch is only a file containing a hash of a commit.
The commit history is not a linear timeline! Actually, it is a DAG, a directed acyclic graph, in other words, it is set of different timelines that may have a common past between them (a fork point) and that may have a state where both timelines join (a merge commit), but without any loops!
The staging area, formerly called cache (still used sometimes…) and
internally called index is the place where a commit is prepared (in other
words, the place where you send you file when you git add it). The content of
the staging area is the content of your last commit with the changes that you
made and added using git add (the ones that are shown in green in git
status).
The working directory is the directory where you files are in you disk. From
the perspective of view of who is writing and running code, this may look as the
main area of Git (compared to the commit history and the staging area). However,
from the perspective of view of Git, this is the least important, as
everything here can be modified, deleted, created and Git won’t track it,
unless, of course, you explicitly tell Git to do that (using git add, for
example).
If you didn’t know something from this section, I strongly recommend you to read the section 1.3 from the Pro Git book.
Pathspec and git ls-files
So, let’s go to our first concept here: the pathspec (as a non-native English speaker, I struggle to say that word…). A Pathspec is a string that can be passed as argument to several Git commands to specify files.
A nice way to see the pathspecs in action is using git ls-files. That command
lists all the files in the staging area, but if you pass a pathspec as an
argument for it, it will list all the files in the staging area that matches the
pathspec.
The most trivial pathspec is the path of a file. If you have a file called
README.md, then README.md will be a pathspec that represent it, and if it is
inside a directory called src, a pathspec for it is src/README.md. Note
that, by default, pathspecs are relative to the current directory.
*
The first superpower of the pathspec that I’ll show you is *. That character
matches any characters. For example, this command lists every file that ends
in .c in the staging area that are in the current directory or in its
subdirectories, recursively:
git ls-files '*.c'
You may be thinking: “nothing new here, it is just a shell star
expansion”. Well, no. Note that '*.c' is between quotation marks, this means
that it’s a string, and the shell is not expanding it. Instead, Git is expanding
it.
What’s the difference? Remember that I said “in the current directory or in its
subdirectories”? This is the difference between the pathspec * and the shell
*: in this situation, the shell * will only match files in the current
directory, while the pathspec * will match files that are in the current
directory or in a subdirectory of it. So, if we run:
git ls-files *.c
the shell will replace *.c by all the files that end in .c in the current
directory, so git ls-files will only list them.
: + magic words
: is a special character in pathspecs, that is followed by a magic word. I’m
not going to deep dive into it, but there are two cases of it that I find very
useful.
The first one is :/. This means the root of the repository. So, if you are in
a subdirectory and want to match something by its absolute path (that is,
relative to the repository root), you need to use :/. For example, :/*.c
will match all the files that end in .c in the repository, no matter where
they are located.
The second one is :!. If we put a :! in the beginning of a pathspec, then
the pathspec will match all the files that doesn’t match the rest pathspec. For
example:
git ls-files ':!*.c'
That command will list all files in the staging area that don’t end in .c.
More about pathspecs and git ls-files
Pathspecs are really useful to select files to pass as arguments to Git. You can
learn more about them on the Git glossary (man gitglossary), searching by
“pathspec”.
git ls-files, that I used as an example for pathspecs, is also a good tool to
find files in the repository. It can replace the command find, as it has a
cleaner syntax than the latter.
Git Grep
git grep, as the name says, is a grep powered by Git.
So, what does it mean? Well, remember that I said the Git is perhaps the tool
that knows the most about your code? git grep takes advantage of it to make a
better grep!
The syntax of git grep is, basically, the following:
git grep [<flags>] [<pattern>] [<commit>] -- [<pathspec>]
You can use several flags of grep in git grep, for example, -E, -P or
-i. The pathspec and the commit are optional. The -- is optional in most of
the cases, however, it is recommended to use it to avoid ambiguities.
If you provide a commit, than Git Grep will search for the pattern on that commit. However, Git grep won’t search on other commits.
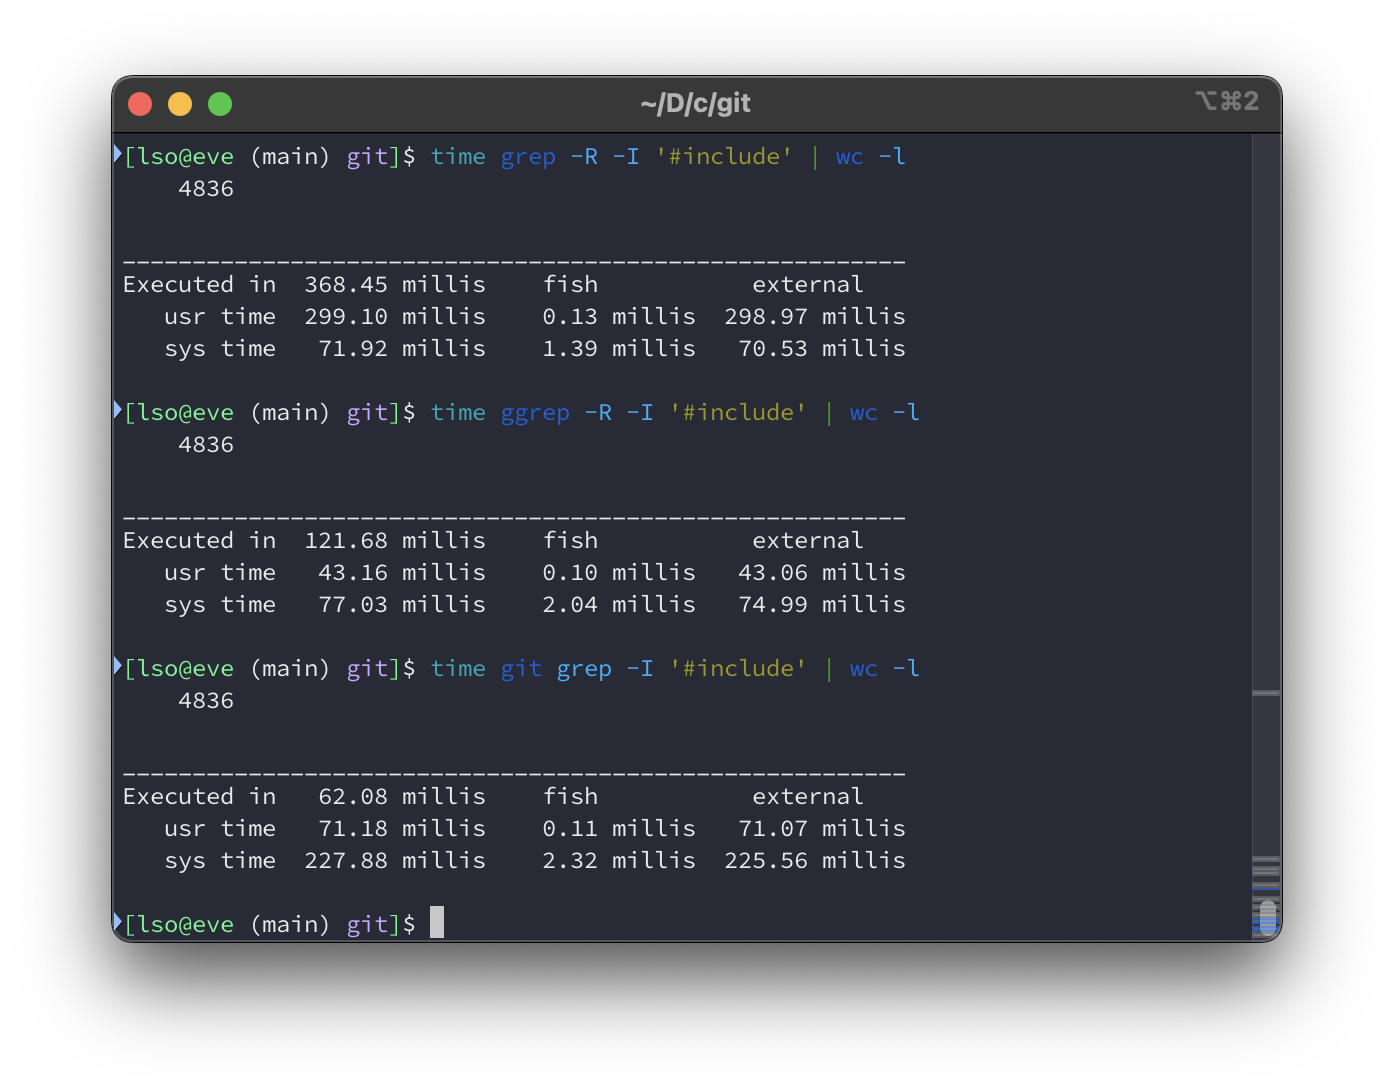
If you don’t provide the pathspec, it will search for a pattern on all files in
the current directory or its subdirectories. It is really faster than GNU
Grep or BSD Grep. You can see that in the following image, I’m searching
#include on the Git source code using BSD Grep, GNU Grep and Git Grep:
Nice, but what more Git grep can do? Well, take a look at the flags --heading
and --break. --heading groups the output by the file where each line is, and
--break only inserts a line break between the groups. This is very useful for
searching, for example, the files that call a function or that use a constant.
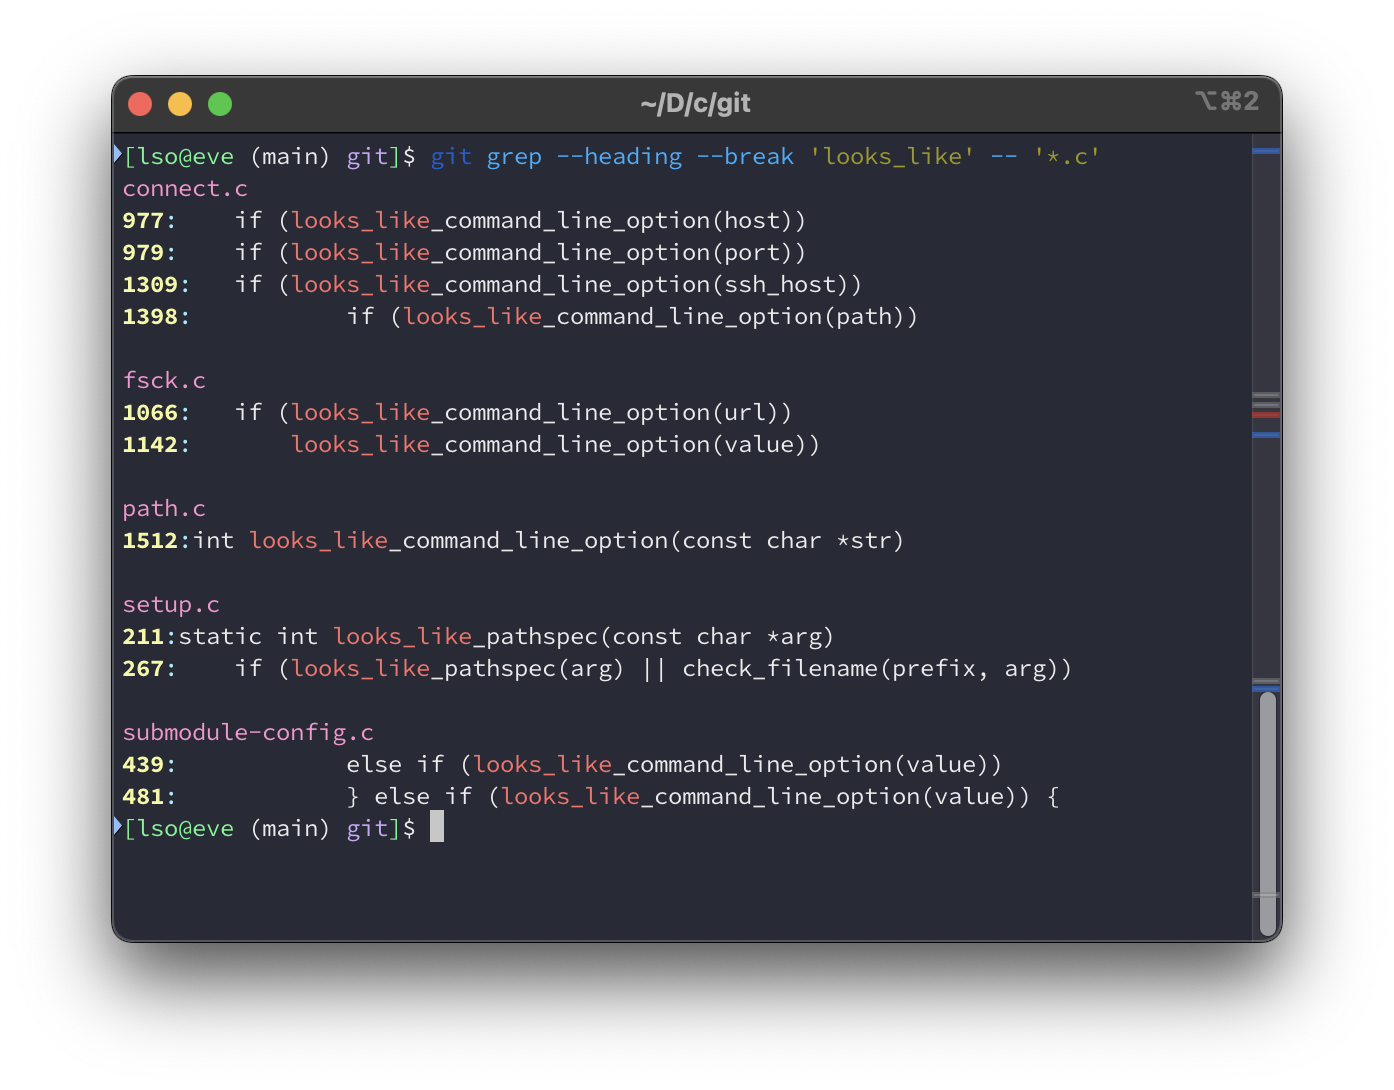
--heading and --break, searching for looks_like on every C file.A very cool feature of Git Grep is the flag -W (or --show-function). When
using it, Git grep will not only show the line that contains what you are
searching, but it will also show the entire function where it is
located. So, let’s check the same command the I’ve shown in the last picture,
however, adding the flag -W ( git grep --heading --break -W 'looks_like' --
'*.c'):
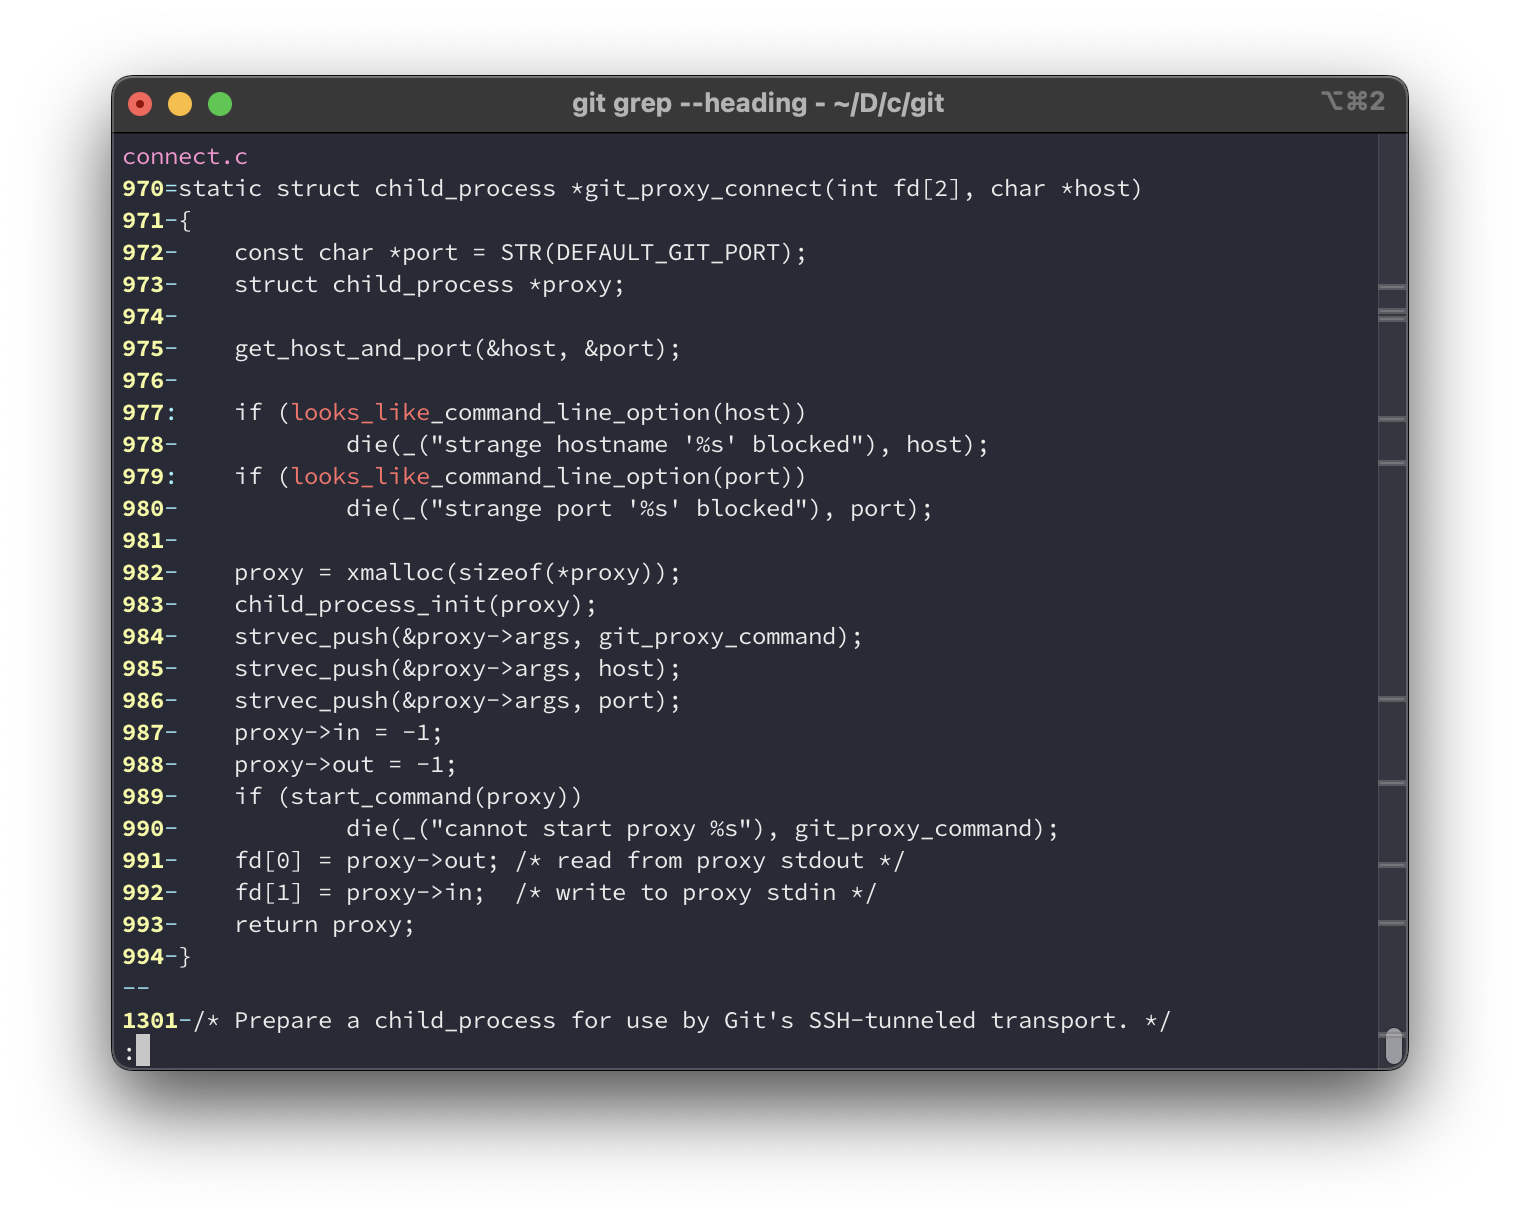
-W showing the entire function that contains looks_likeGit Grep is an amazing tool to find code. Ok, but you may be thinking “nice, but I can do something like that using the code navigation of my IDE, jumping to definitions and usages”. That is true for several cases. However, Git Grep is still very useful when you want to search only in certain files (using the pathspec as a restriction), when you want to search for a generic regex instead of a name of variable or function, when you want to search in another commit or when you just don’t want to open an IDE and want to search directly from the terminal. It’s not a tool that is replacing another, but a tool to complement the other.
Git Blame
If you ever used git blame, there’s a good chance that you are expecting me to
say something about it and how it is wonderful. If it is the case, please, don’t
skip this section because I have something very important to tell you.
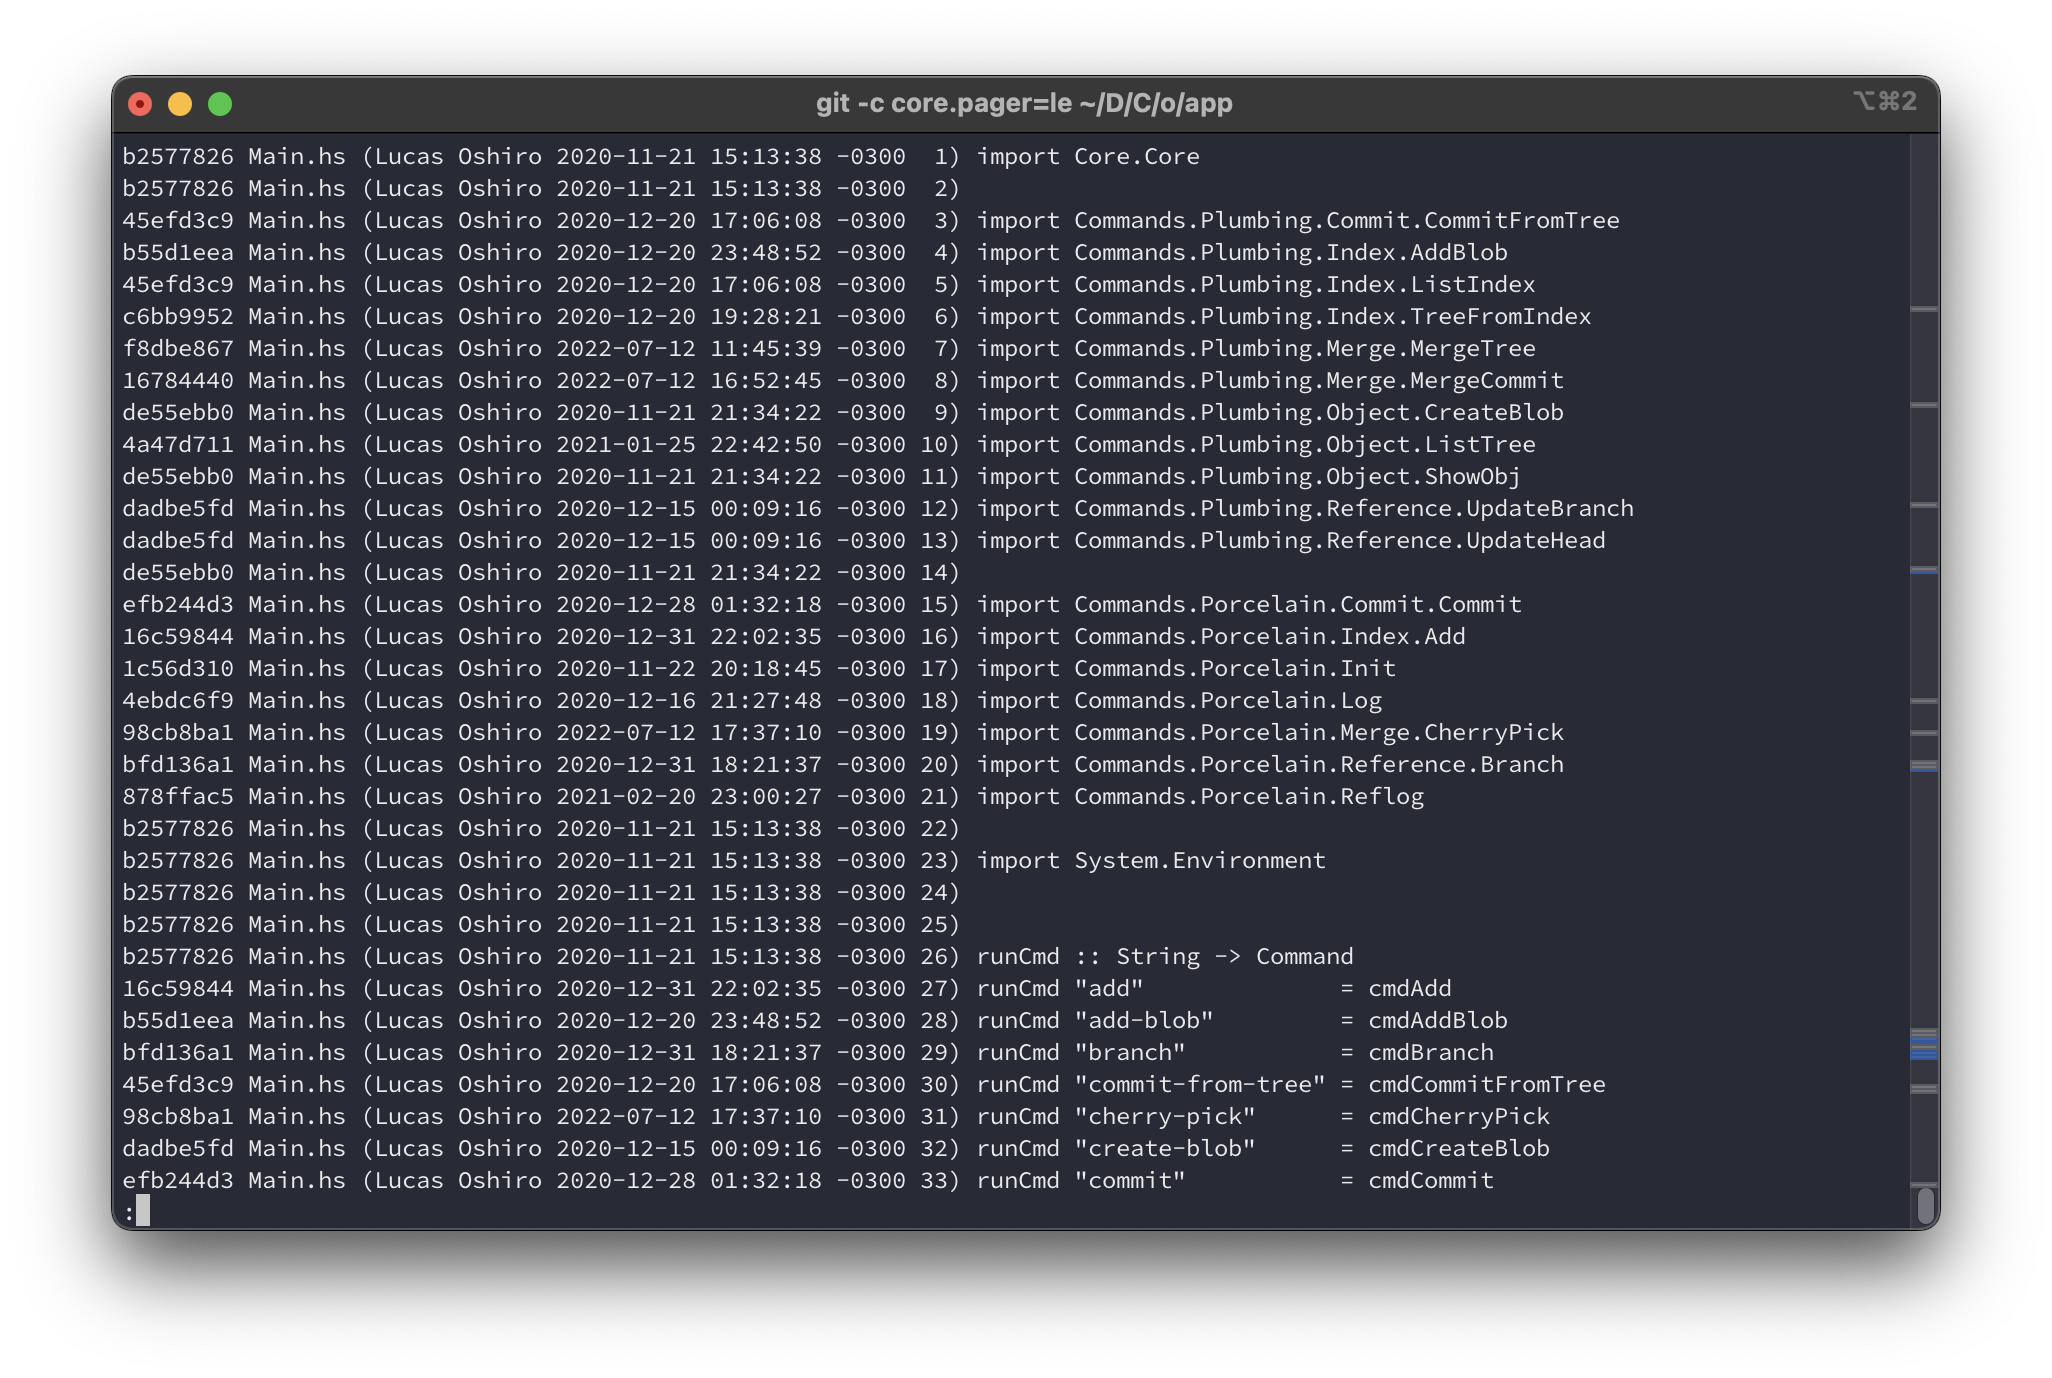
If it’s not the case and you never heard or never used git blame, it is a tool
that shows for every line who was the last person that changed that line, the
commit where it was done, and the timestamp of it. Look at the following
picture. I’m running git blame Main.hs, where Main.hs is a file that I wrote:
That’s cool, so, does this show evidences so I can curse the code of my
colleague? Well, in most of cases, yes, however, remember: git blame shows
only who made the last change. Maybe that person only changed the name of a
variable, applied a codestyle change, moved a function declaration to another
file or many other things that the change was almost irrelevant to the code
behavior. Many times the person doesn’t even know what the code does (for
example, that person only ran a tool that formats code, without even reading
it).
This also applies to the other information: the timestamp that is shown is only the last time that the line was changed, and it doesn’t tell us when it was created. Same for the commit: the commit that is shown is the last commit that changed something on that line, not that last commit that changed something useful or the commit that introduced that line.
Git Blame (and tools based on it, like Annotate on JetBrains IDEs, magit-blame on Emacs or GitLens on VSCode) is of course very useful, however, it is not the source of the truth. If you need to find something more than know about the last change of a line, then you’ll need something more powerful…
Git Log and its hidden powers
git log is one of the most famous commands of Git. It is the command that you
run to look the commit history, nothing new here. However, it has some lesser
known features that I consider the next step when Git Blame is not enough for
your needs.
Passing a pathspec as an argument to Git log
You can restrict the git log output by passing a pathspec as the last
argument, like this: git log -- <pathspec>. Again, the -- can be omitted in
most of the cases, however, it is good practice to keep it to avoid ambiguities.
When you do that, the output will contain only the commits that introduced a change to the files that match the pathspec in relation to their parents commits. Look at this example:
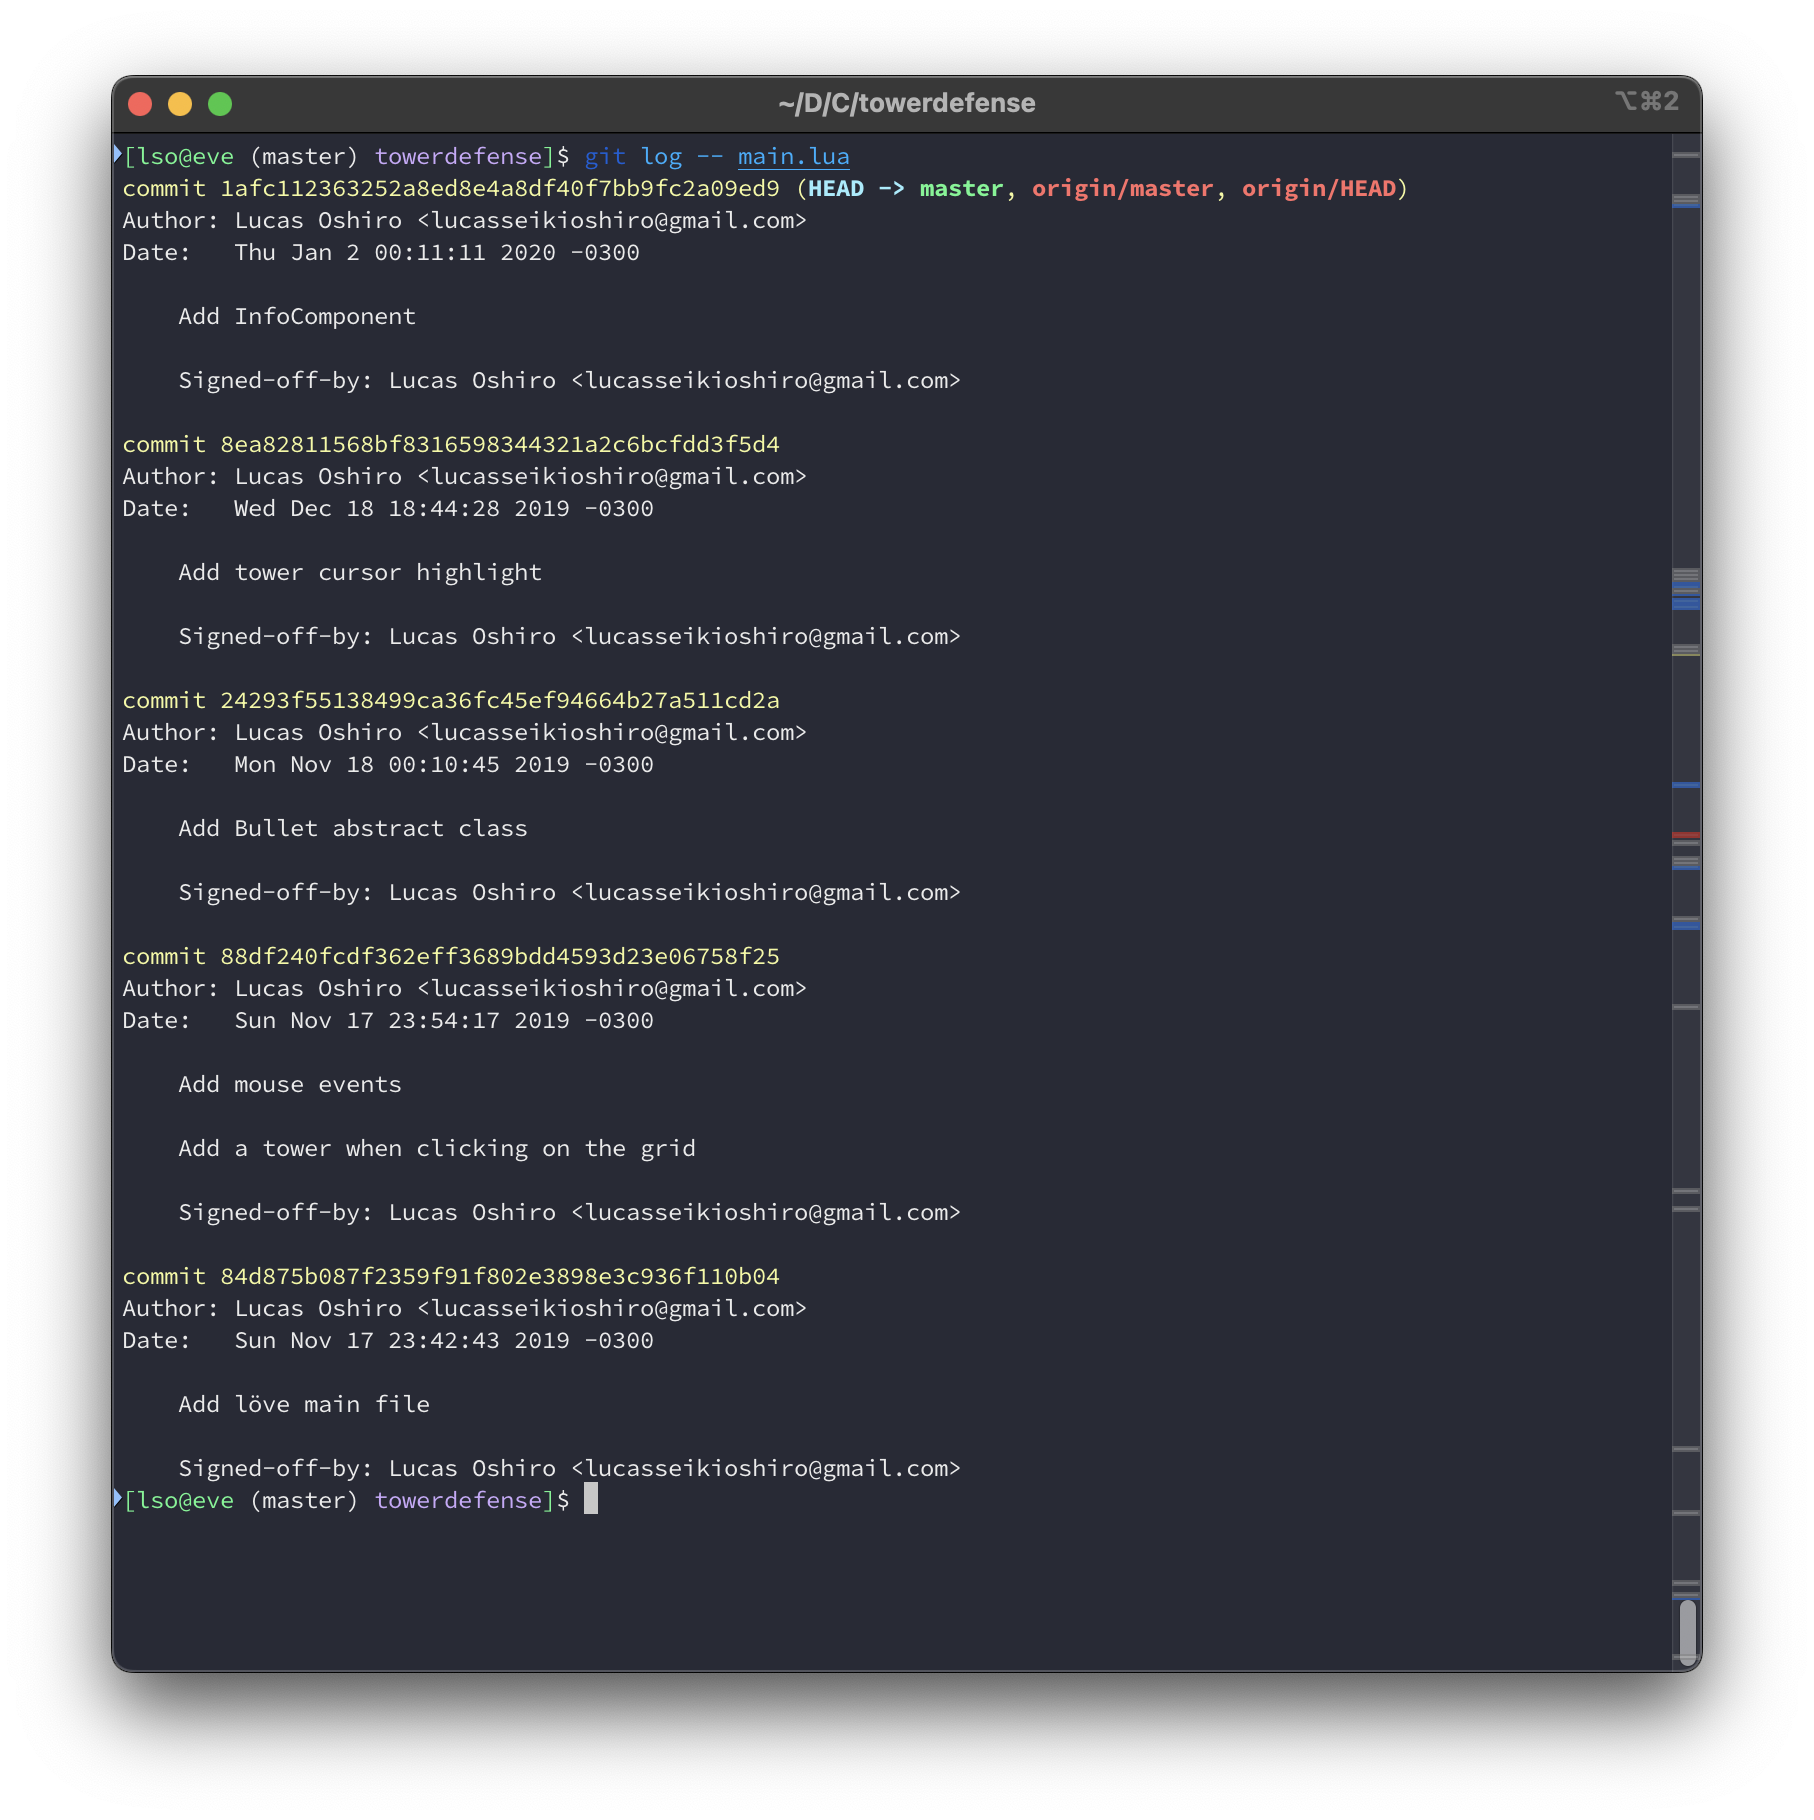
If you want to know when something was introduced, you can inspect those commits. When you find it, you will know who and when introduced the commit. If the commit message is well-written and if the change was atomic, you can even know why the commit was created (and why its code exists). If you are using GitHub, you can also copy the hash of that commit and search the PR that contained it, and its even more information, given that you can read the discussion and the code review!
This feature of Git Log saved my life several times. If I found a piece of code that was hard to understand its purpose, instead of only trying to read it, I used Git Log to find the commit that introduced and check what the person that wrote it was trying to do, what was the context of its creation, what was the problem it was aiming to solve, and so on. Just try it!
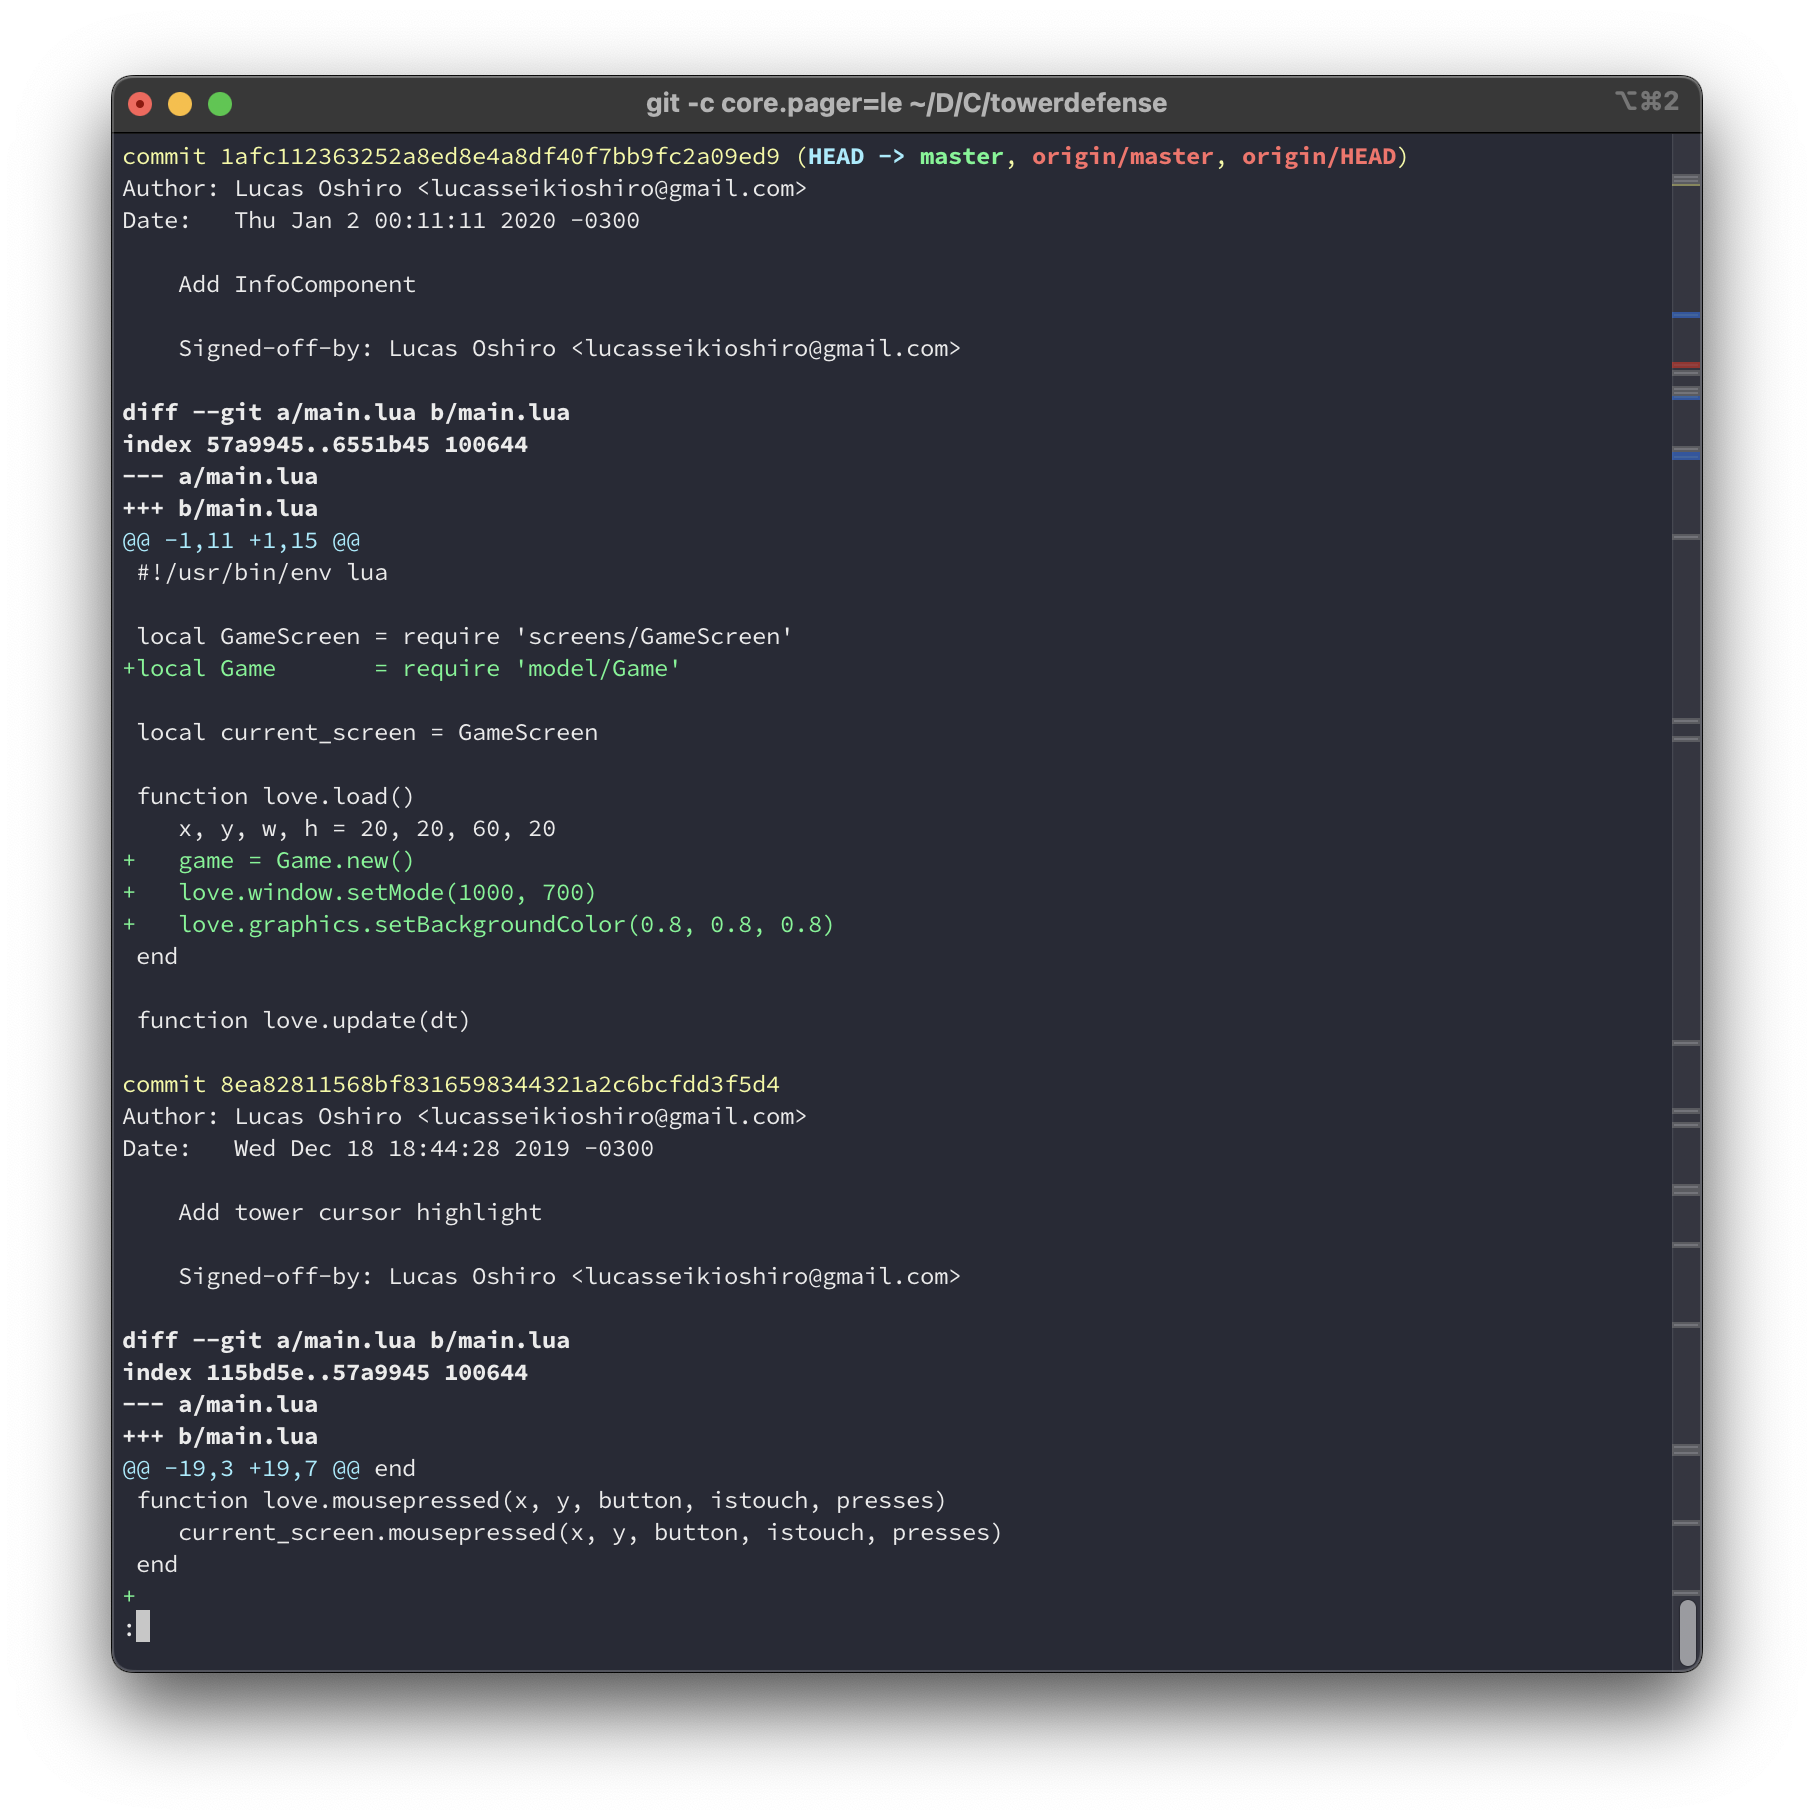
The -p flag
So, it may be boring to inspect every commit manually. You can use -p to show
the patch of every commit. In other words, it is like running git show for
every commit in the log.
The -L flag
Perhaps the file is too long and you only want to check the log of a little
section of it. Then you can use the -L flag to restrict it to the portion of
the code that you want. It comes in two flavours:
-
You can restrict by the limits of a range, which can be line numbers or regexes:
git log -L <start>,<end>:<file>. For example:git log -L 10,20:my_file.cwill return the log for the range between lines 10 and 20 of my_file.c; -
(I think it is cooler) You can check the log of a function:
git log -L :<function>:<file>
In this example, I’m checking the log of the function M412 from M412.cpp of
Marlin using
git log -L :M412:M412.cpp:
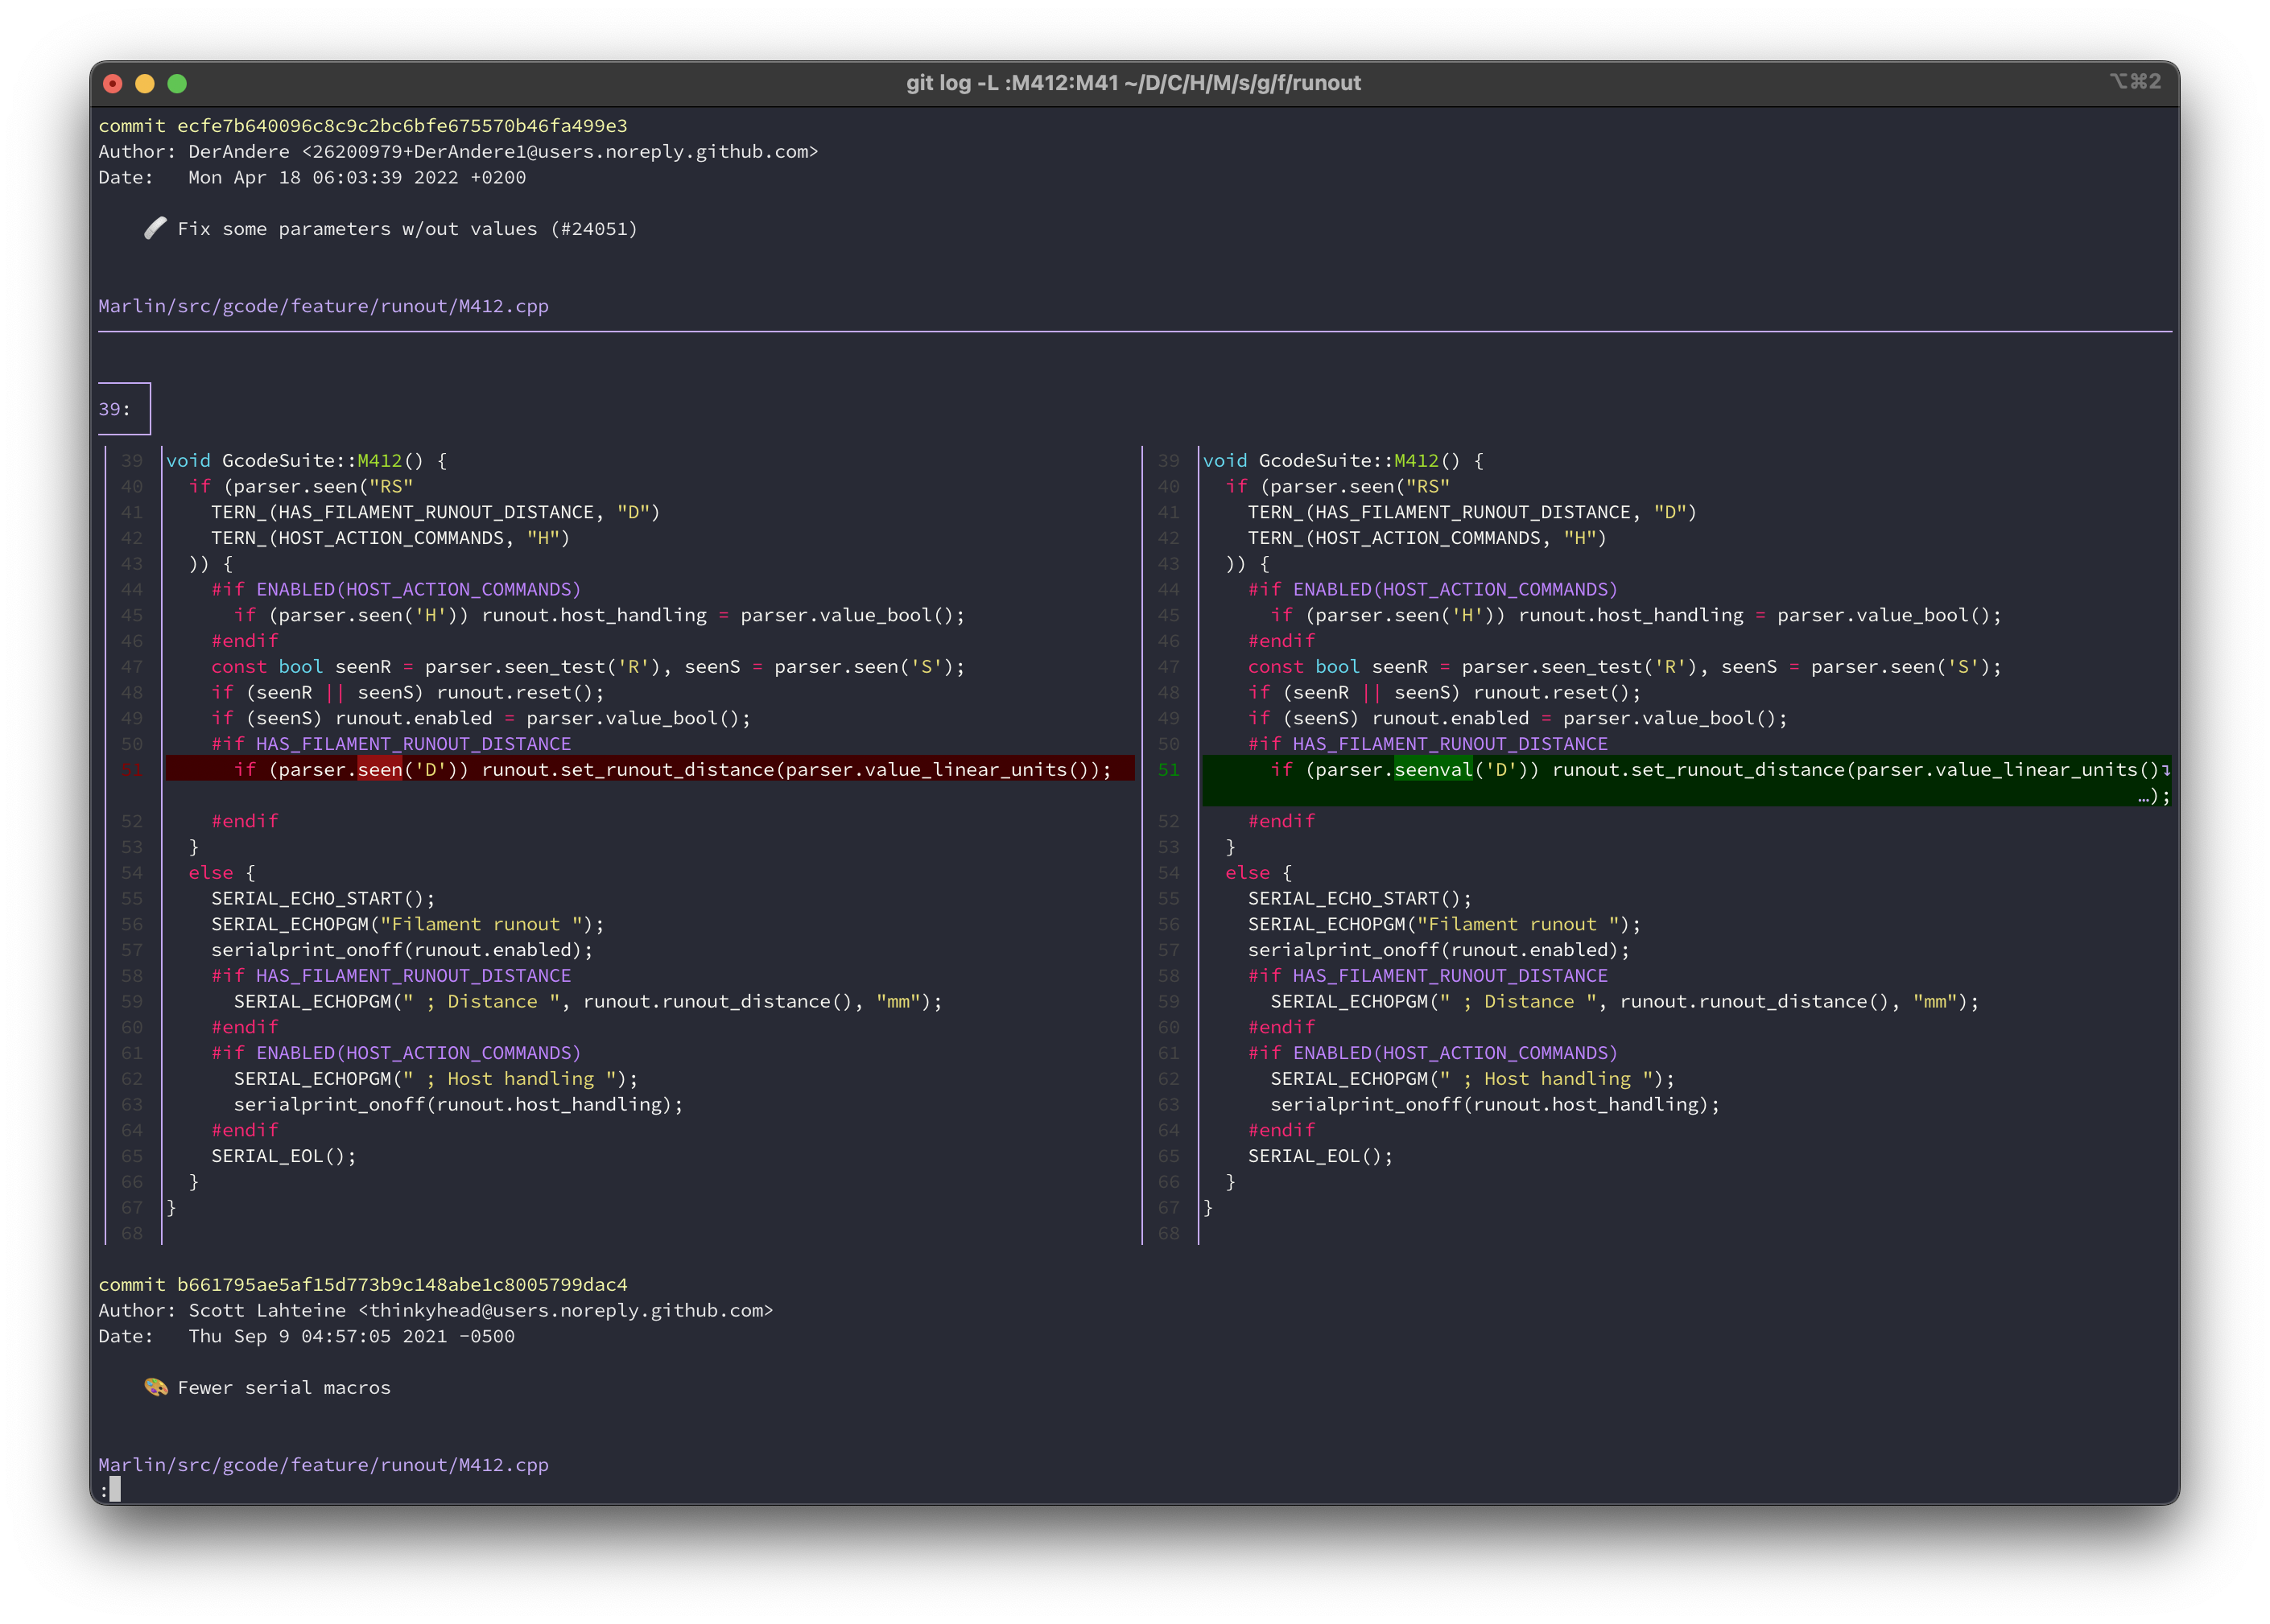
git log -L in action. Note, I'm using
delta to format the output
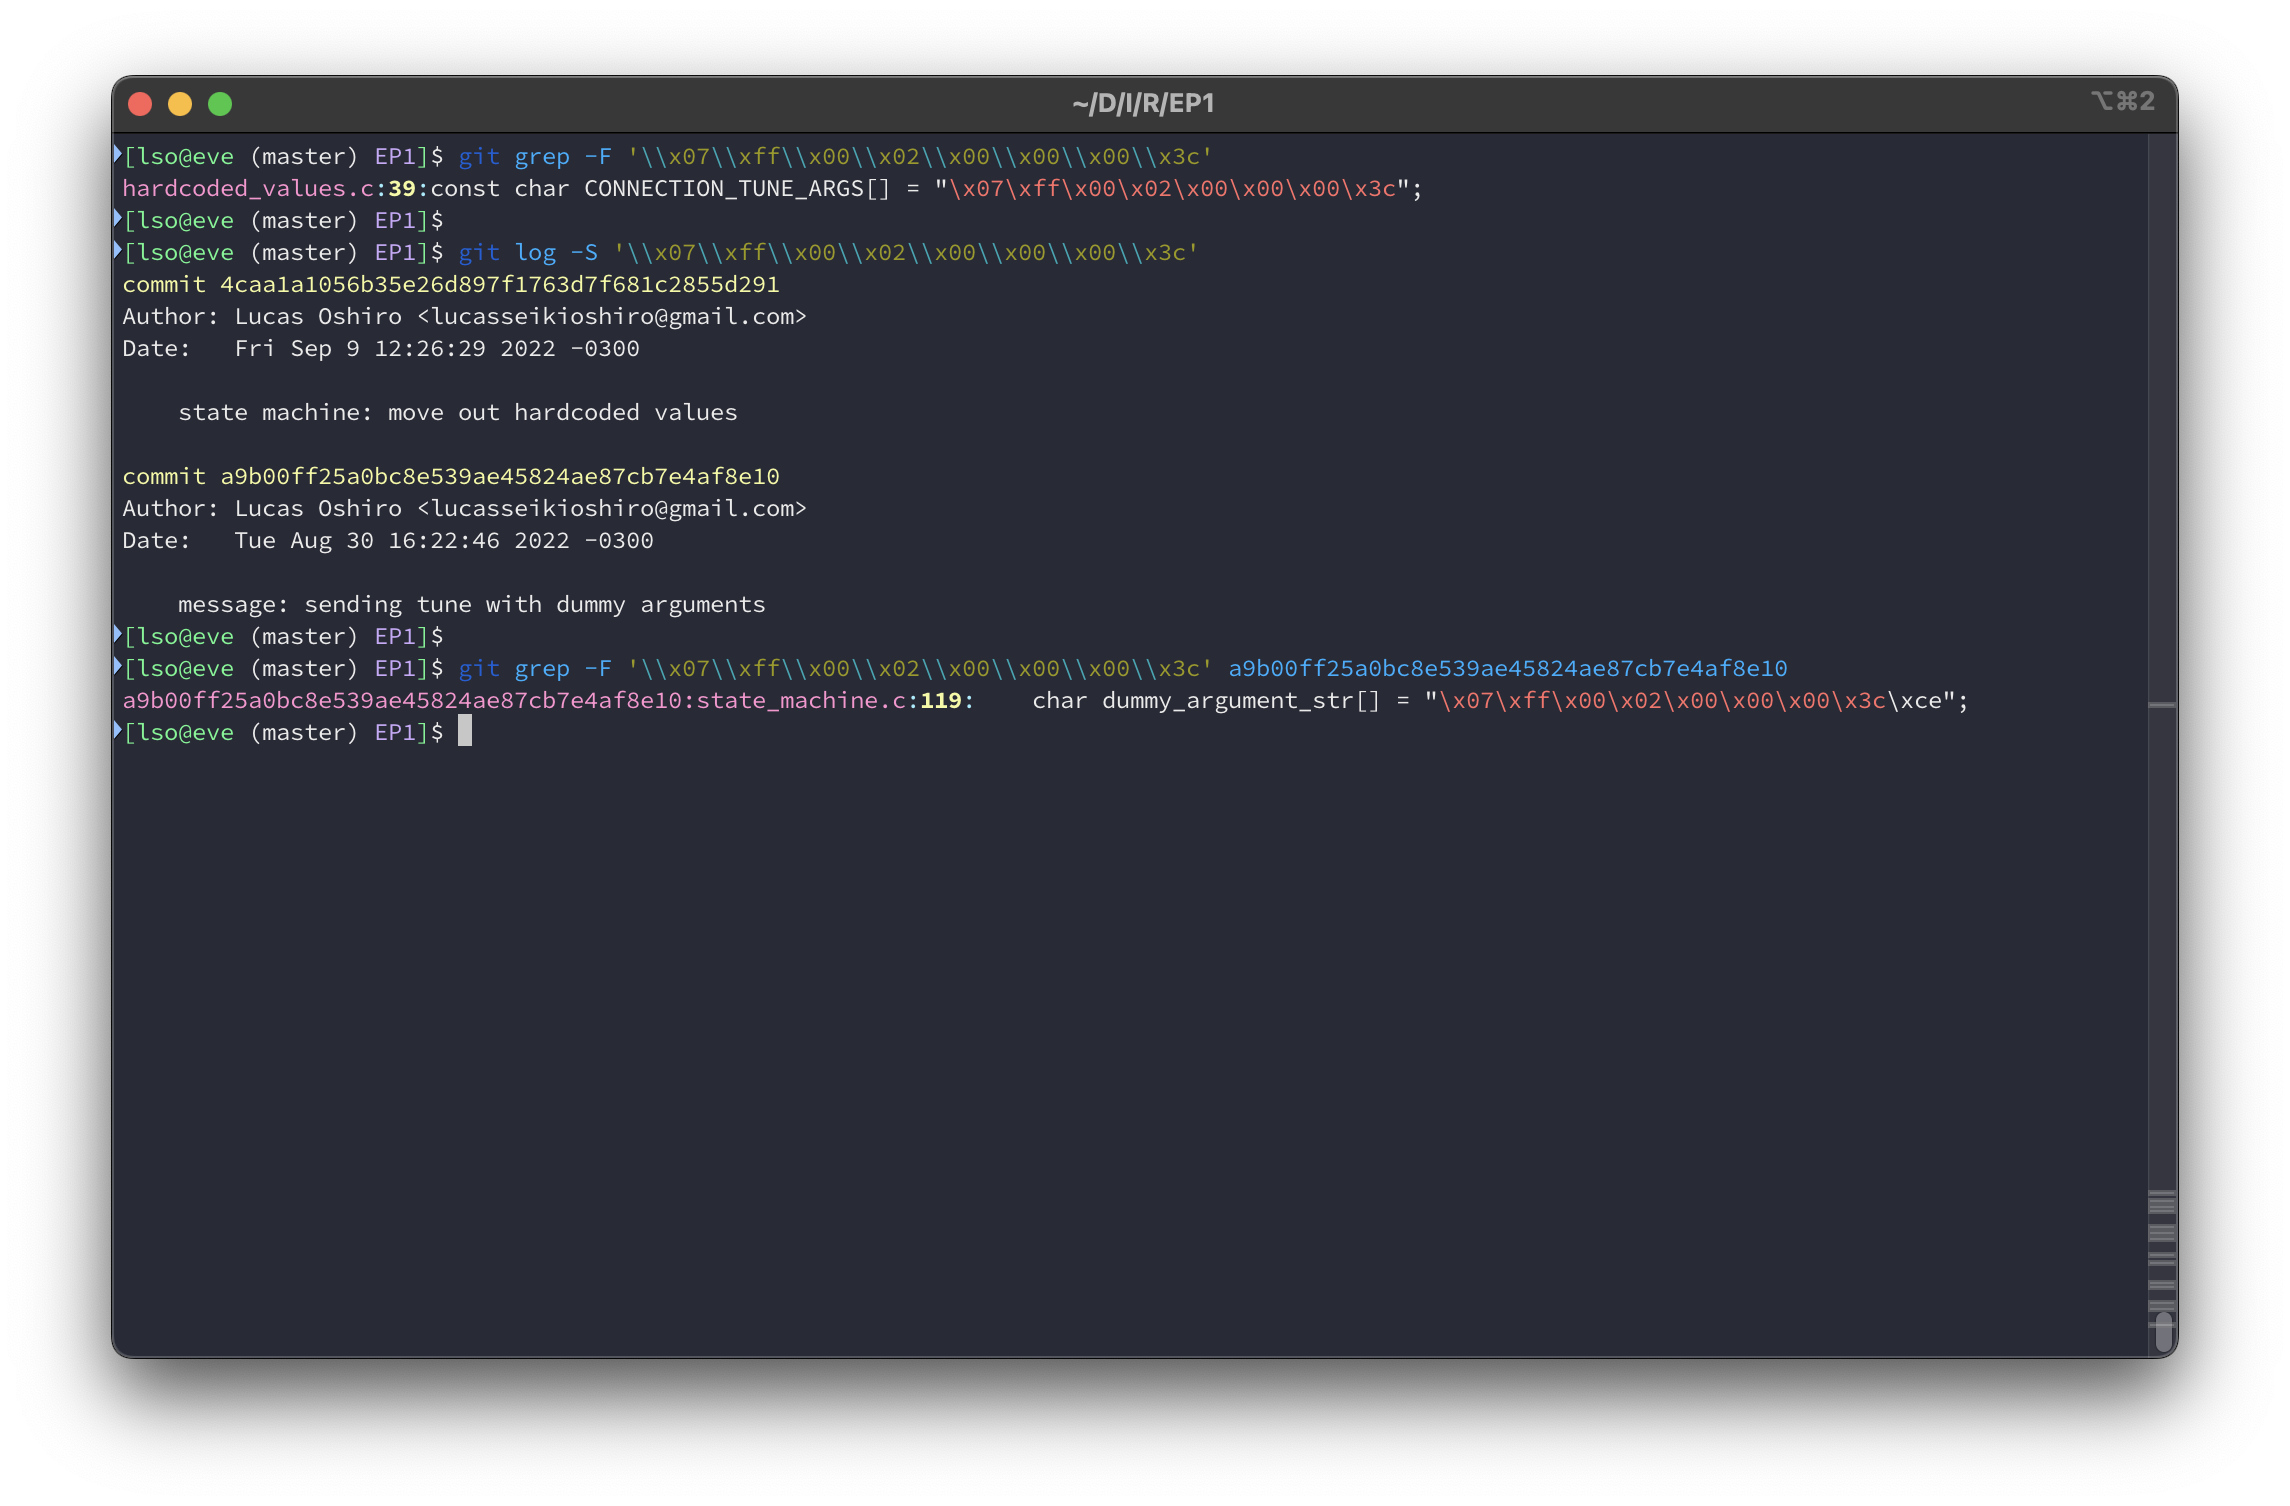
The -S flag
The -S flag is a hidden gem in Git log. With it, you can see all the commits
that increased or decreased the number of occurrences of a string. This works
almost as Git Blame killer for me: even if someone moved a piece of code to
another place or another file, git log -S will find the introduction of it.
In the following picture, I’m using git log -S to find the first introduction
of a string contained in the file hardcoded_values.h (as you can see in the
output of the first git grep). Then, note that the introduction of that string
wasn’t in that file (as you can see in the output of the second git
grep). Firstly, it was part of state_machine.c, then it was moved into the
other file. This solves the problem of Git Blame blaming the person that moved
the line, instead of the one that created it.
You can also use -G instead of -S. This allows you to use a regular
expression instead of string.
Git Bisect
git blame tell us the last change of a line and git log -S tell us when a
when string was introduced or removed. However, they only work over text. For
many cases this is enough, however, sometimes you don’t want to look for changes
in a text, but you want to look for changes in the behavior of the program, like
bugs or anything that is not working as expected.
In those cases, git blame or git log -S won’t be enough, because you don’t
know what code caused that change of behavior, and you don’t know exactly
what to search. In complex projects, maybe that change is in a place that you
would never expect, for example, a class or function that you thought it wasn’t
related to the one that is broken.
And how can Git can help us to find that change?
Ladies and gentlemen, it’s a honour to present you my favorite Git command: Git Bisect! It allows us to find the commit that broke something. Given a “good” commit (a commit that is not broken, created before the introduction of the bug), and a “bad” commit (a commit that certainly is broken), Git will perform a binary search until the broken commit is found.
After bisecting, you can take a look at the commit that created the bug, and find all the information that we discussed previously.
Git Bisect can be used in two ways: a manual one, where it guides you until you find the commit that introduced the bug, and an automatic one, where Git find that commit for you.
A practical exercise
I’ll demonstrate Git Bisect using this repository: https://github.com/lucasoshiro/bisect_demo. It is very simple, it contains only one Python script, with a really weird and hard to understand code:
#!/usr/bin/env python3

from sys import argv
from math import log

ops = 0x2B2D2F2C2A5E3E5F

def func(a, b):
    return '\n'.join(
        (lambda r: f'{a} {f} {b} = {r}')(eval(f'{a}{f}{b}'))
        for f in ops.to_bytes((int(log(ops, 16)) + 1) // 2, 'big').decode())


if __name__ == '__main__':
    a, b = map(int, argv[1:])
    print(func(a, b))
And what does it do? Well, it takes two numbers as arguments, and it performs some operations using them:
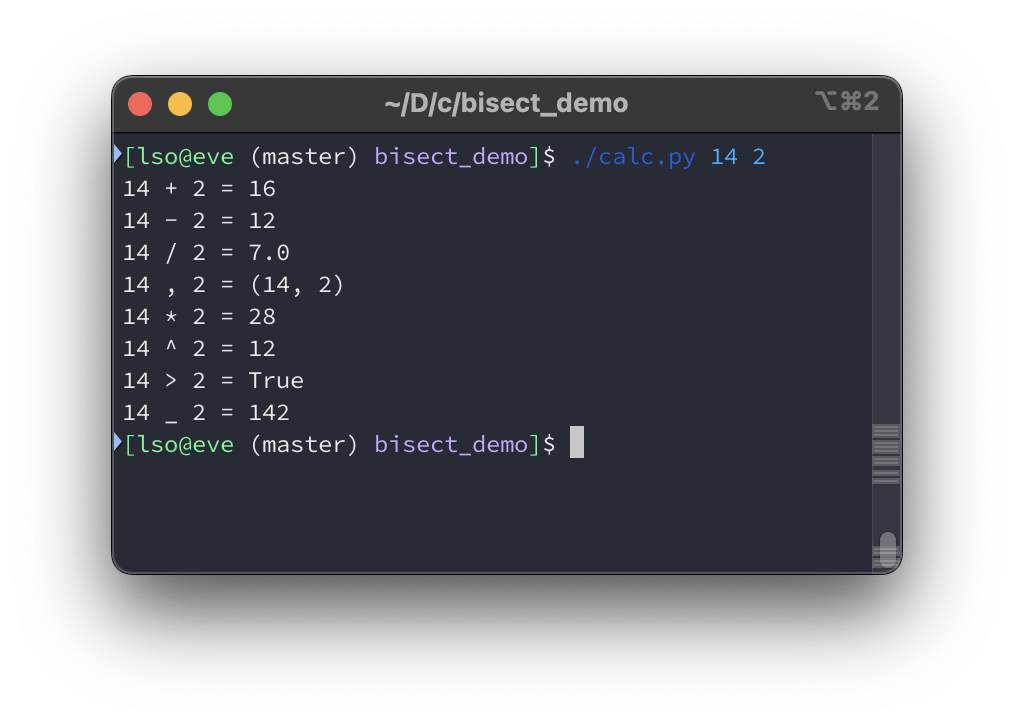
calc.py runningThis works for mostly any numbers, except if the second one is 0. As one operation is division and we’re not handling division by zero error, this input breaks the script:
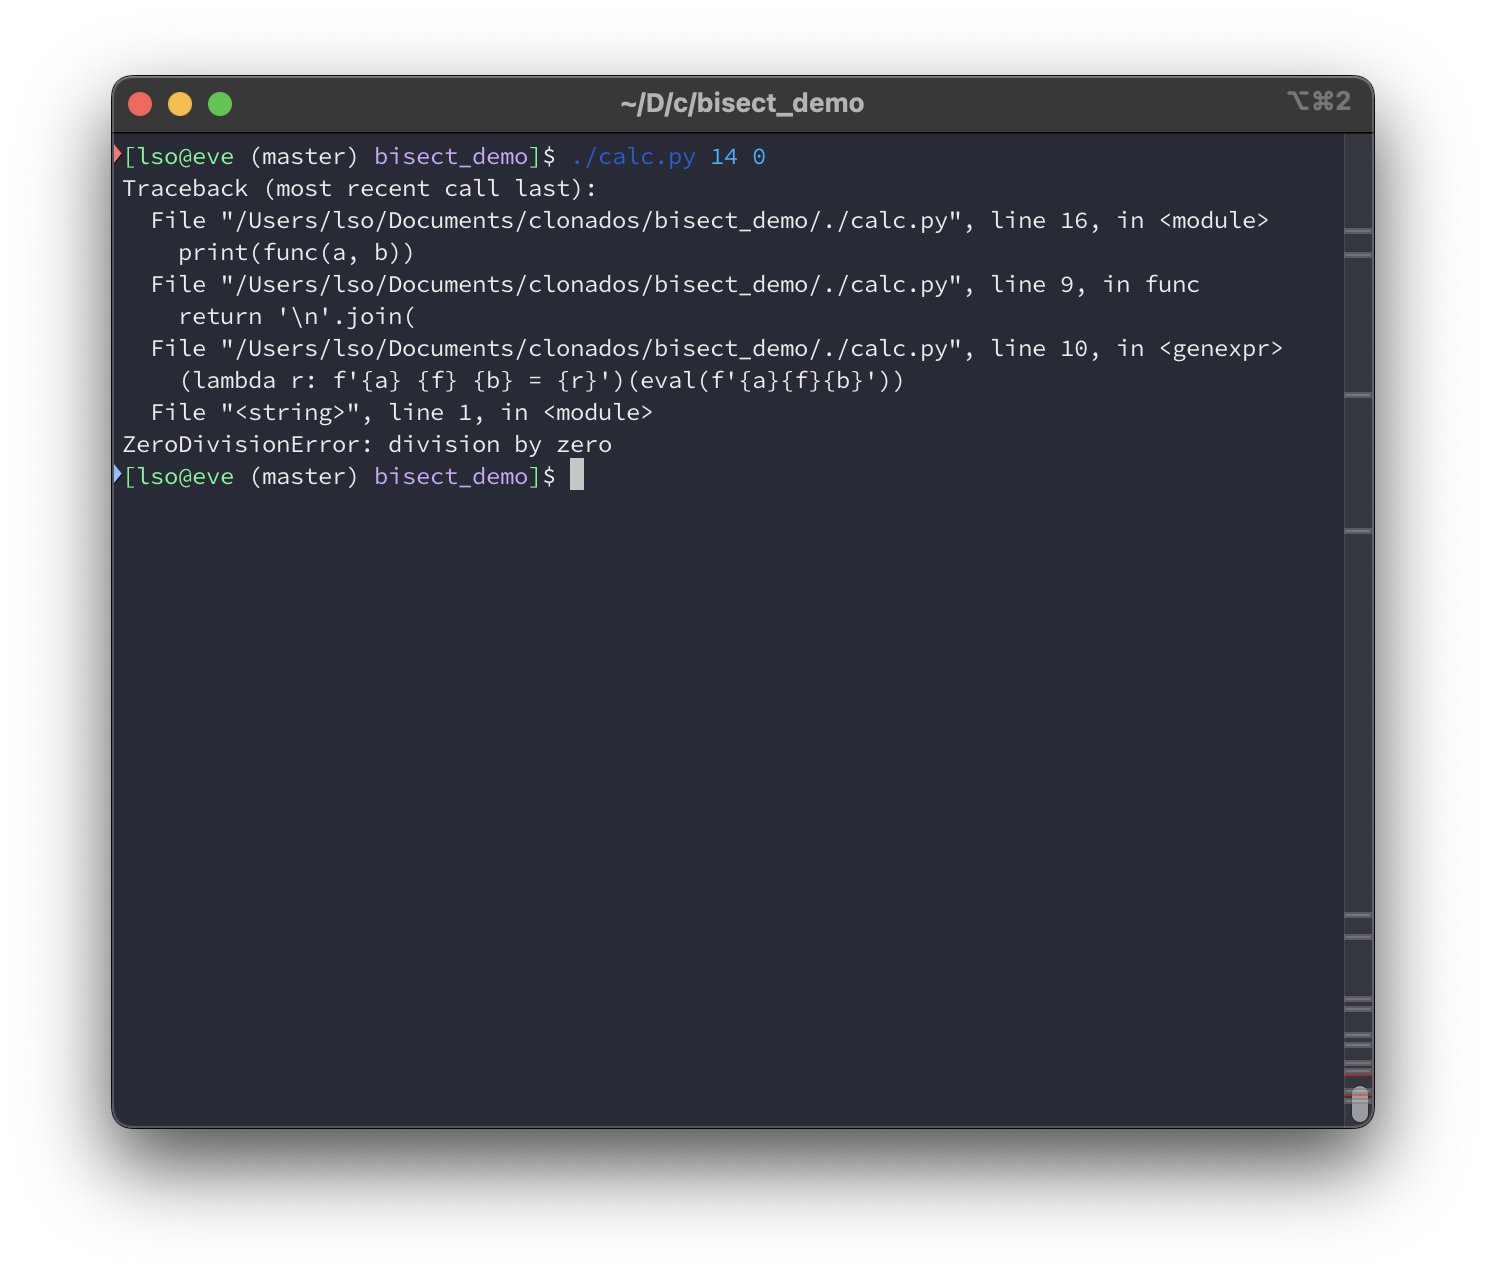
As you can see, we know where the code is breaking, however, we can’t see a division in there. If we want to fix this code, we need to find what causes that division, and it’s not clear here.
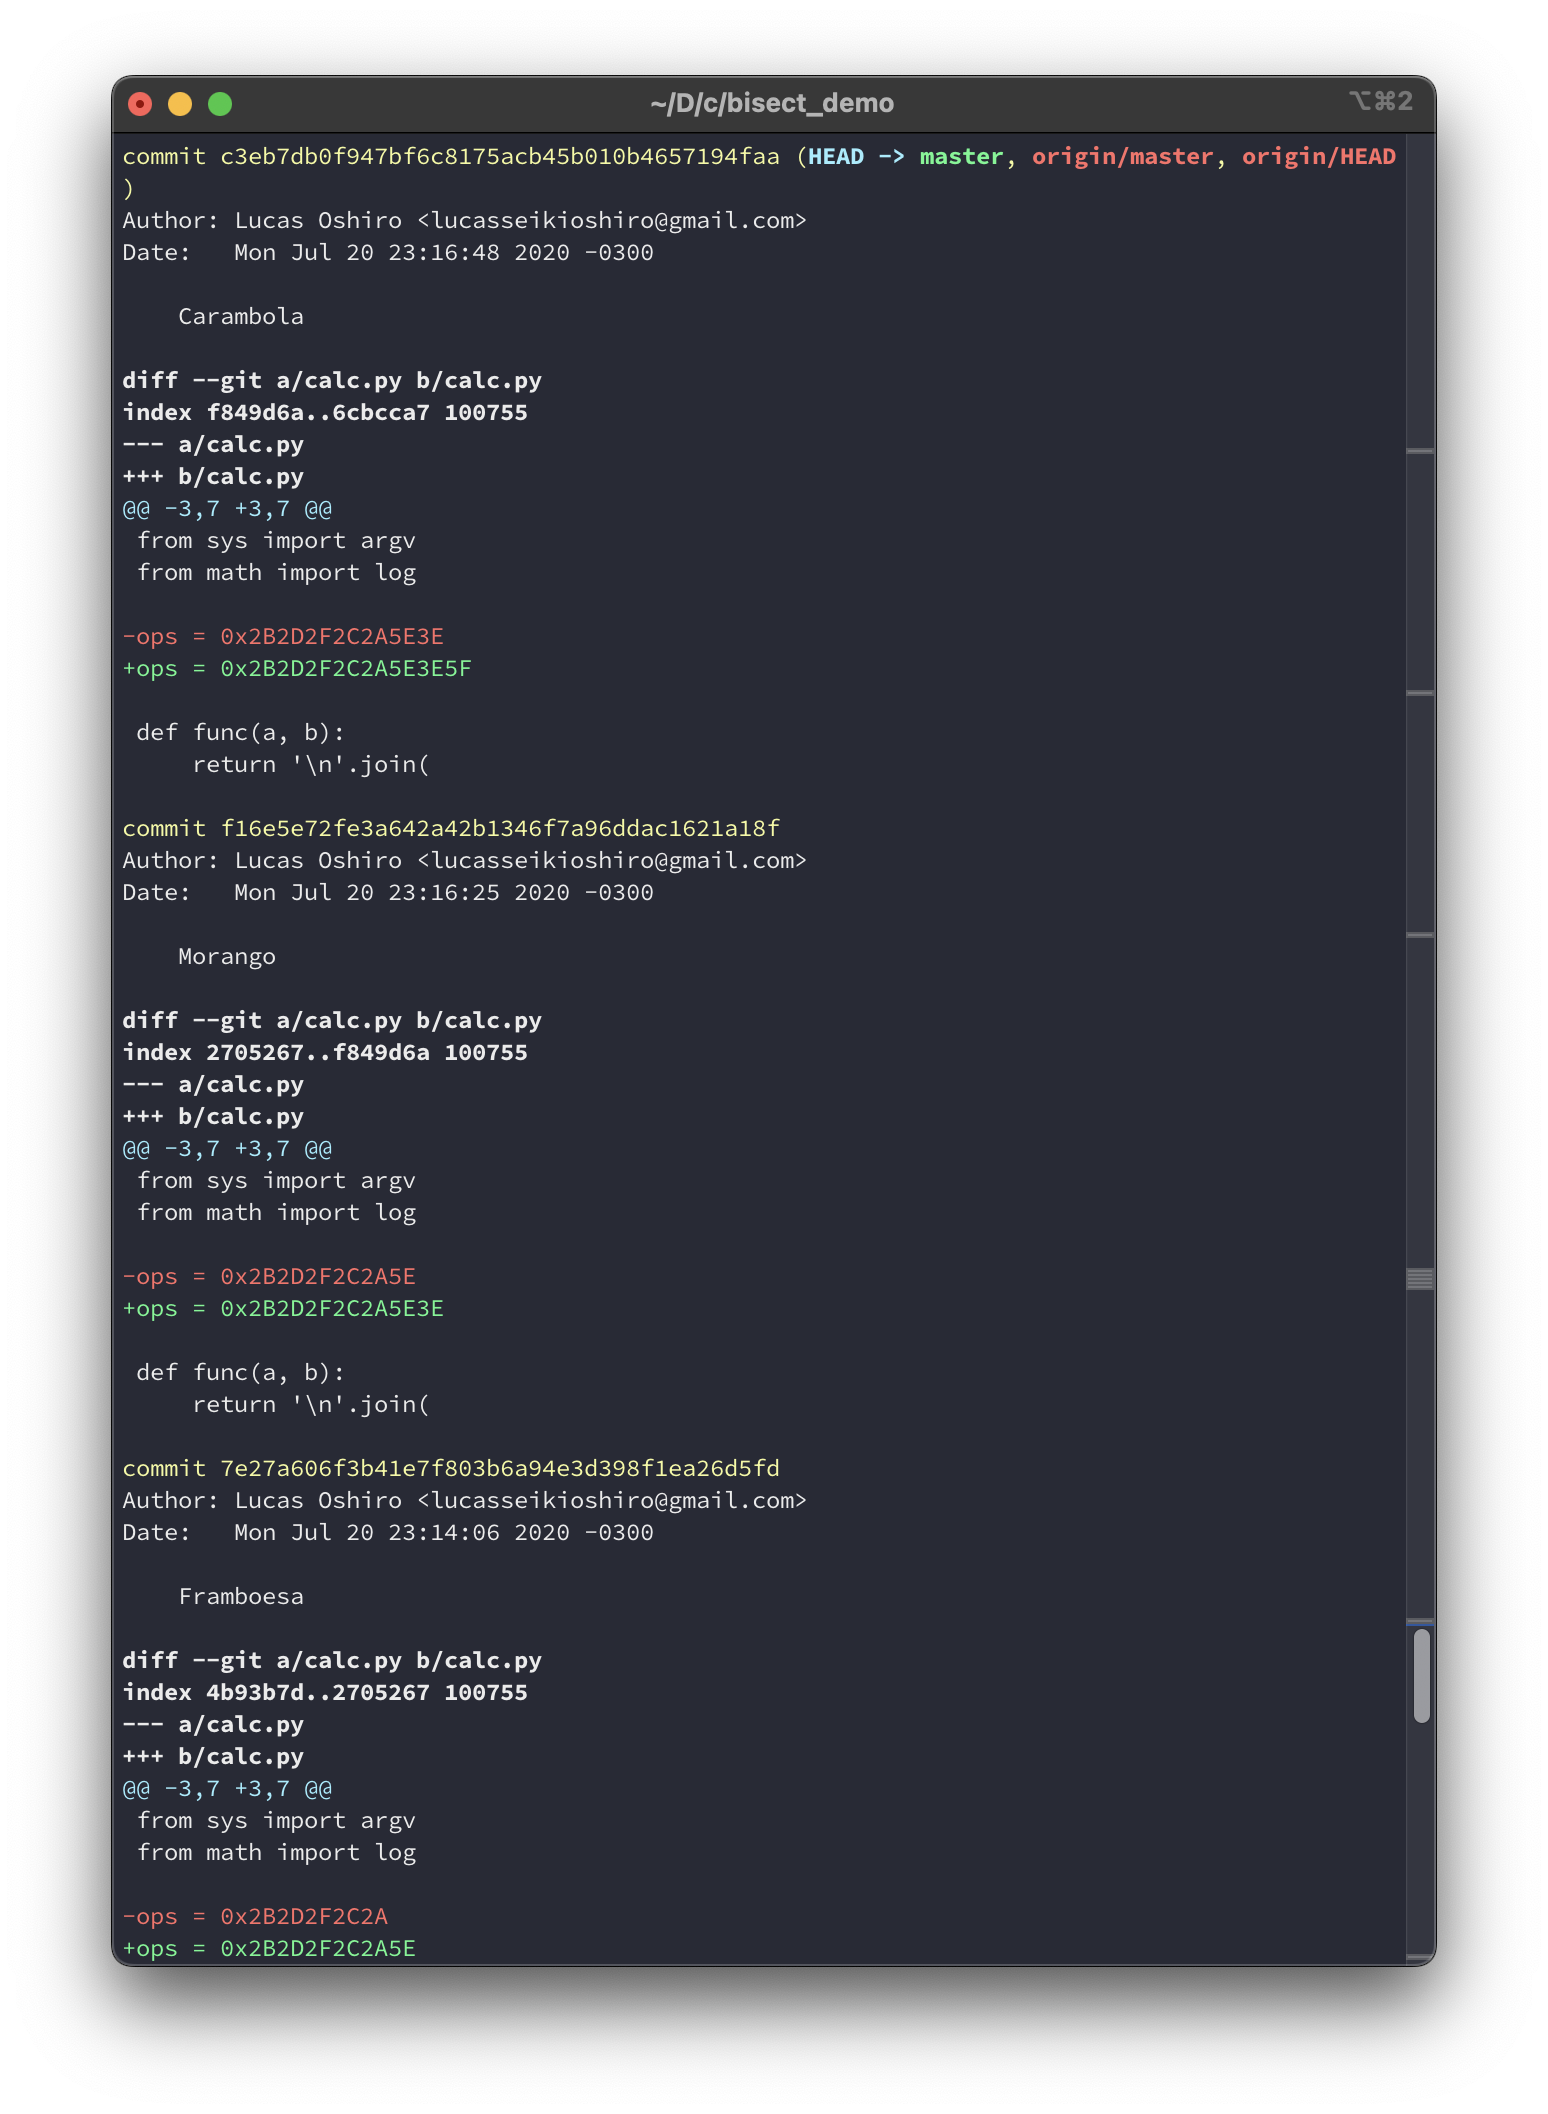
Of course we can use git log here and try to find a commit that may inserted
the bug. However, even running git log -p -- calc.py can’t help us, look:
Git Bisect to the rescue!
Running Git Bisect manually
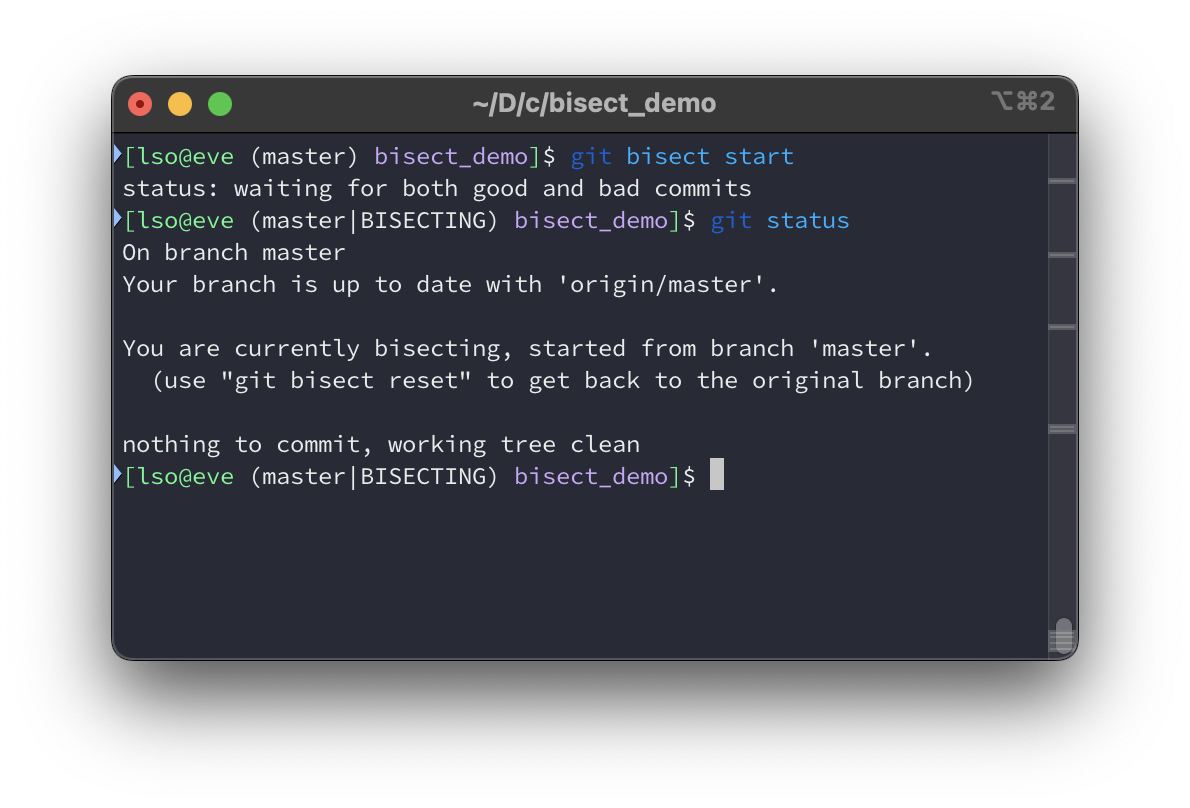
The first thing that you need to do is to start to bisect. You do this by running
git bisect start. If you run git status, it will tell you that you are
bisecting. Some shells that shows Git info on the prompt also shows tells you
that you are bisecting. If you are done with bisecting, then you should run git
bisect reset to end the bisection.
I said that in order to bisect you need a “bad commit” and a “good commit”. In this case, we know that the last commit is a bad one, as it breaks when providing 0 as the second parameter.
In a real scenario, you’ll probably would know what is a “good commit”, it is
any commit that you know that contains a code that works, for example, a commit
of the last release that is not broken. In this case, I’m telling you that the
initial commit is not buggy. Just checkout to it and try to run calc.py
passing 0 as the second argument:
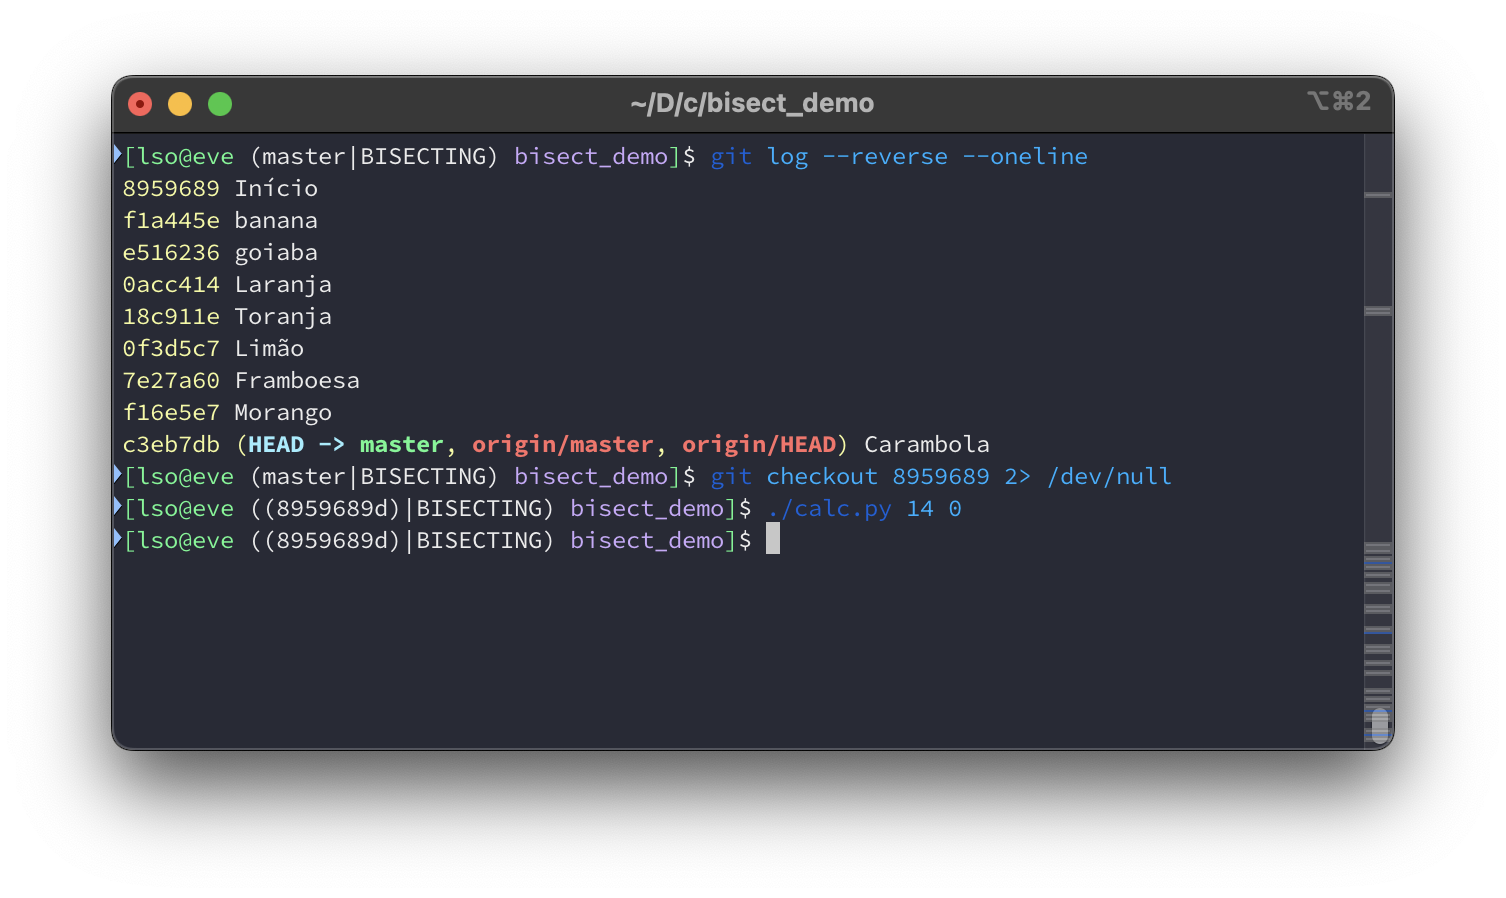
So, now we know the bad and the good commit, our current situation is that (the first one is the first commit):
8959689 Início     <- GOOD!
f1a445e banana
e516236 goiaba
0acc414 Laranja
18c911e Toranja
0f3d5c7 Limão
7e27a60 Framboesa
f16e5e7 Morango
c3eb7db Carambola  <- BAD!
And we need to tell Git Bisect about it. We run git bisect good 8959689 to
tell it that the initial commit is the good one. As the current commit is a bad
one, we can just run git bisect bad to tell it, but you could also run git
bisect bad c3eb7db or any other commit that you know that is bad.
After running that, Git Bisect will automatically checkout to the commit in the
middle of the history between the good and the bad commits, that is, 18c911e
(Toranja). Now, we run ./calc.py <something> 0 to find if this commit is a
good or a bad one.

Ok, now our situation is that:
8959689 Início     <- GOOD!
f1a445e banana
e516236 goiaba
0acc414 Laranja
18c911e Toranja    <- BAD!
0f3d5c7 Limão
7e27a60 Framboesa
f16e5e7 Morango
c3eb7db Carambola  <- BAD!
And we need tell Git Bisect that this commit is a bad one. So, we run
git bisect bad. As you might suspect, now Git Bisect will checkout to the
commit in the middle between 8959689 (Início) and 18c911e
(Toranja). That commit is e516236 (goiaba).
Ok, now we do the same thing: run ./calc.py <something> 0, check whether it
breaks or not, if so run git bisect bad, otherwise run git bisect good, until it
ends the binary search and finds the buggy commit. We’re doing it here:

git bisect bad and git bisect
good until the end of the binary searchThen we found the commit that introduced the bug: 0acc414 (Laranja). Now you
exit bisecting with git bisect reset, then it will checkout to the same commit
where you were when you ran git bisect start. If you are curious about why
that change breaks the code, here’s a clue: 0x2F is the hex value of the ASCII
number for /.
Git Bisect is cool, but running it manually like this (checking if the commit is
a good or a bad one and running git bisect bad or git bisect good) can be
very boring. Depending on the situation, you can do that automatically using
git bisect run!
Running Git Bisect automatically
If there is a command that can tell you if the commit is good or bad, then Git Bisect can perform the binary search automatically! That command can be anything, like a shellscript, a Python script, an executable, a test, and so on. The only requirement about it is its status code:
- If the commit is good, then the command should return 0;
- If the commit is bad, then the command should return anything between 1 and 127, inclusive, except 125;
- If it is not possible to tell if this commit is good or bad, then it need to be ignored, and the command should return 125.
In this example, we are checking if the code raises an exception. By default,
when a code exits with an exception in Python, its status code is 1, and it is 0
when everything is ok. Then, just running ./calc.py <someting> 0 is enough, as it
will return 0 when it is ok and 1 when the bug happens. However, keep in mind
that is not always the case, and maybe you’ll need to write a test script.
We start the bisect just like before:
git bisect start
git bisect good <hash of the good commit>
git bisect bad
However, as we want to do perform the bisection automatically using as criterion
./calc.py 14 0, we run git bisect run ./calc.py 14 0. It works like magic:
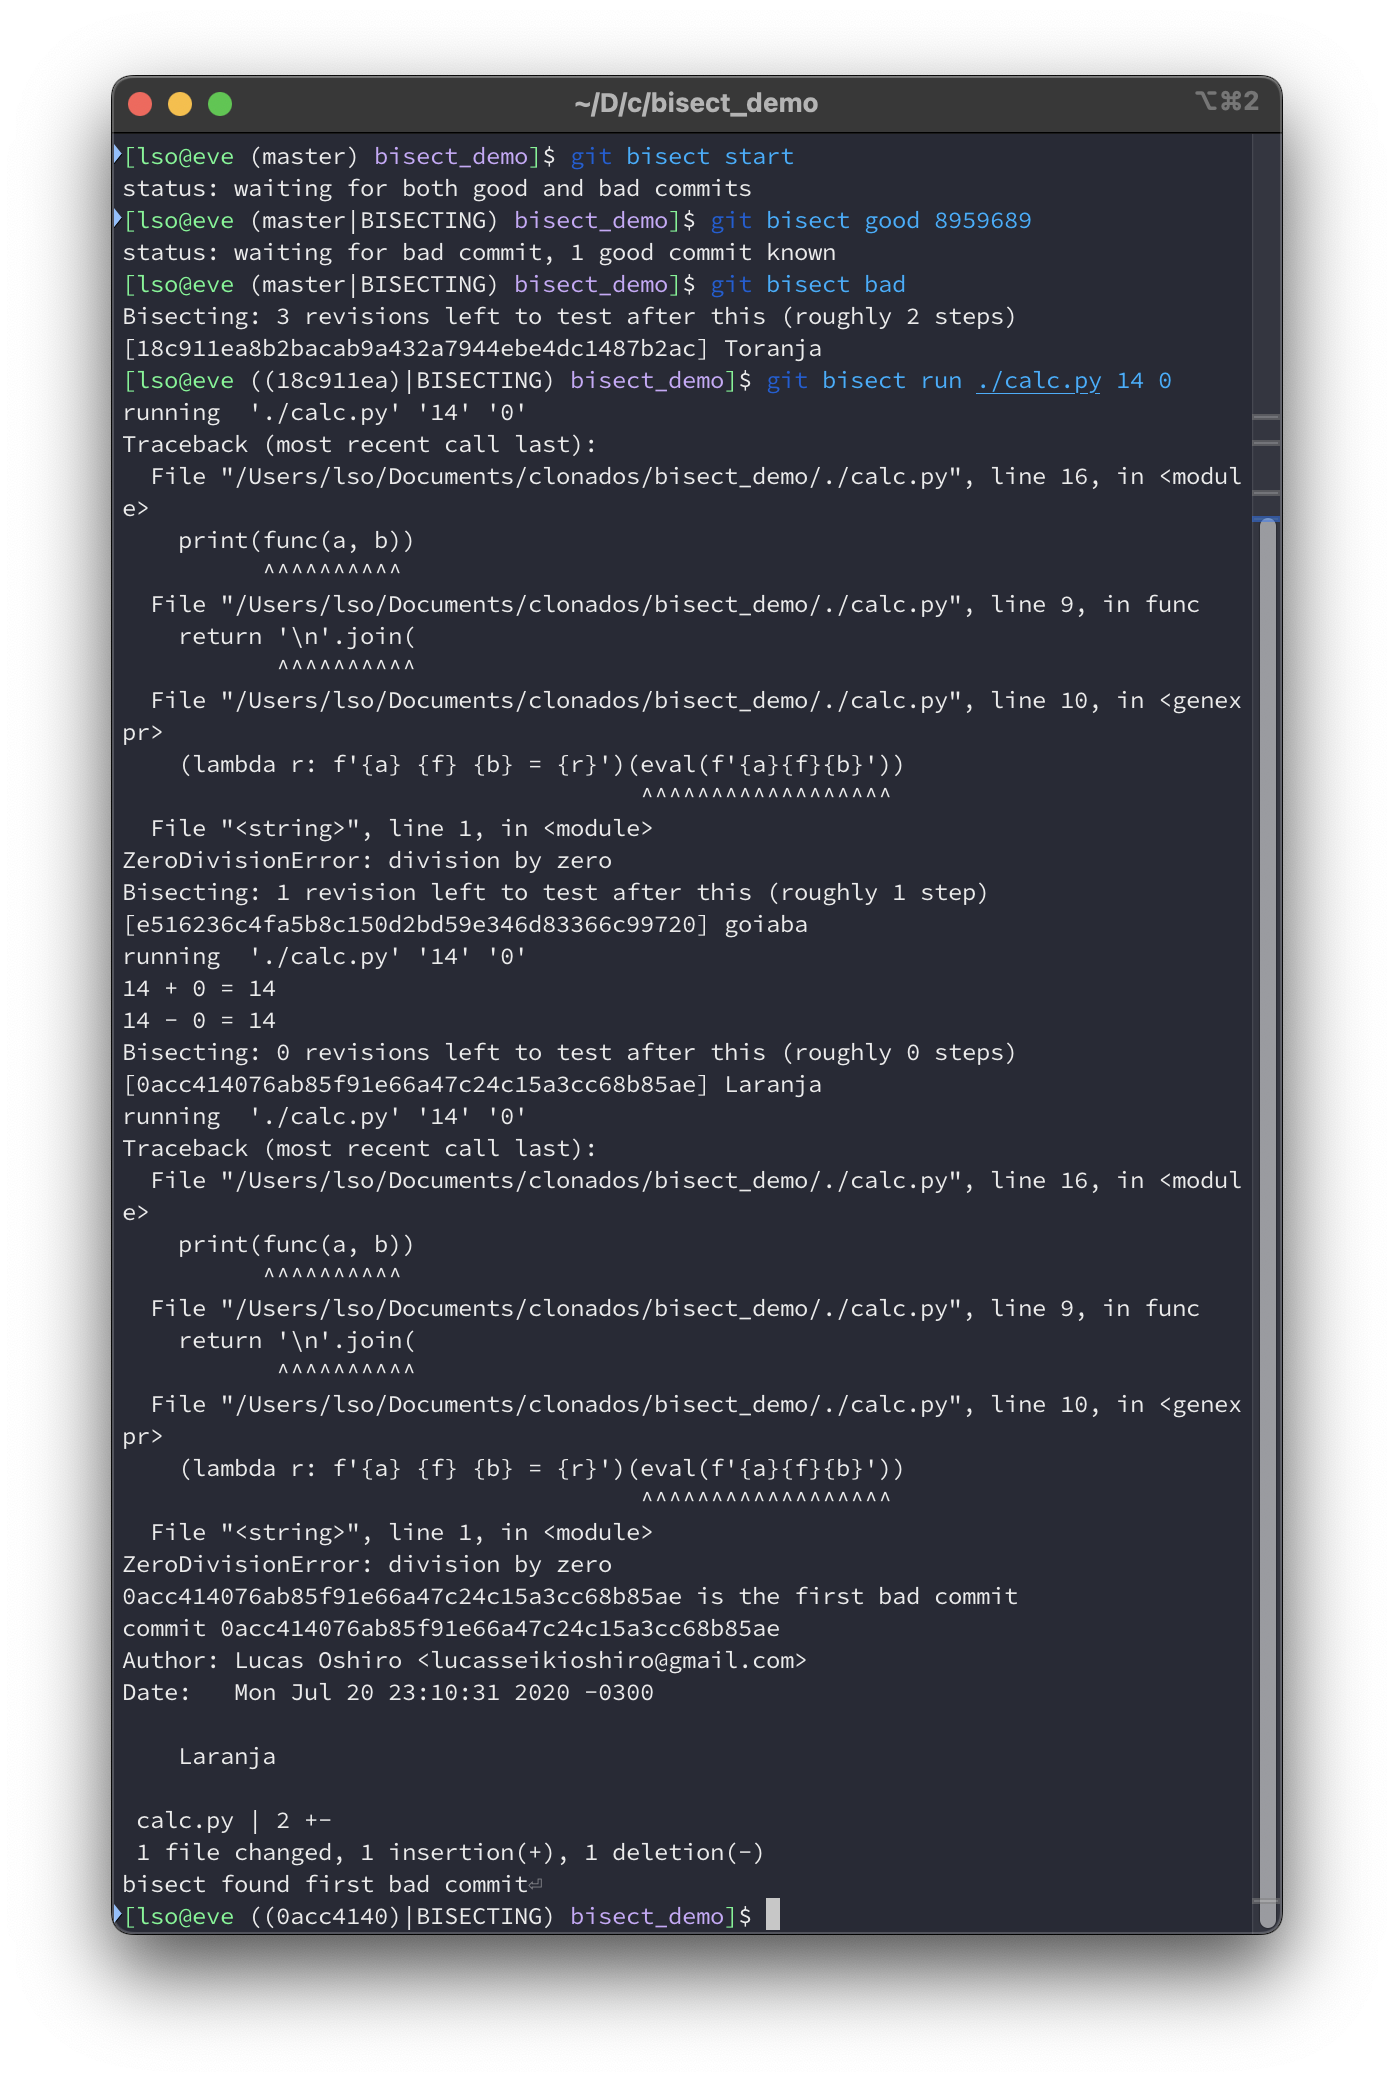
After this, you also need to run git bisect reset to end bisection. That’s it. Isn’t it cool?
Conclusion
These commands helped a lot when I needed to navigate on large codebases and find the causes of a bug. But not only that, they can help you to understand the code, as they are, essentially, search tools. Simple and flexible, but incredibly powerful.
Thanks for reading, if you find something wrong, or if you want to suggest something, open a issue on my GitHub.
2024 update
This reached #5 on Hacker News!

After receiving some feedback, I updated this post with
git log -L:funcname:file, that I didn’t know about until
this answer!