Playing songs in a 3D printer
GitHub: https://github.com/lucasoshiro/music2gcode
What?
The vibration of the stepper motors cause their sound. Its frequency increases as much as the number of steps that the stepper does per second, consequently, its pitch rises accordingly. Here I describe how I used them to play music.
Manipulate the frequency of a stepper motor individually is easy when we have direct access to them. As an example: when we have an Arduino controlling them through a stepper driver. Even though I assembled my own 3D printer using an Arduino and stepper motors, controlling the frequency of each stepper would require to make changes in its firmware, and that’s not in the scope of this project. Here, I aim to play music using only the protocol that is normally used in 3D printing.
In order to do that, I wrote a code in Haskell that receives as its input a song written in a specific format and returns as output G-Code commands that, when executed by a 3D printer, plays a song on its steppers.
Even though G-Code is a universal protocol that is used beyond 3D printers (it is also used by other machines, such as laser cutters), my focus here is the Cartesian FDM 3D printers (perhaps the most common ones…). It would work, for example, in Delta 3D printers.
Input
The input is a song described in a format that is a simplified version of the one that I defined in this project. From the musical perspective of view, it is very limited and not much flexible compared to the most well-known formats, as MIDI, MusicXML, and the formats used by musical notation software (such as Finale, Encore, Sibelius, GuitarPro, Musescore, etc), however, it is easy to be written by humans and parsed by software. Its syntax is the following:
TEMPO <bpm>

BEGINCH
<1st note of the 1st channel>
<2nd node of the 1st channel>
...
ENDCH

BEGINCH
<1st note of the 2nd channel>
<2nd node of the 2nd channel>
ENDCH
As you may thought, BEGINCH and ENDCH define the beginning and the end of a
channel. All the channels are played at the same time.
Each note is represented by <note> <octave> <duration>, using anglo-saxon
notation (CDEFGAB), it can be sharp (#) or flat (b), and the duration is
expressed in number of beats. Double sharps and double flats are not supported.
Silences are can be declared as - <duration>.
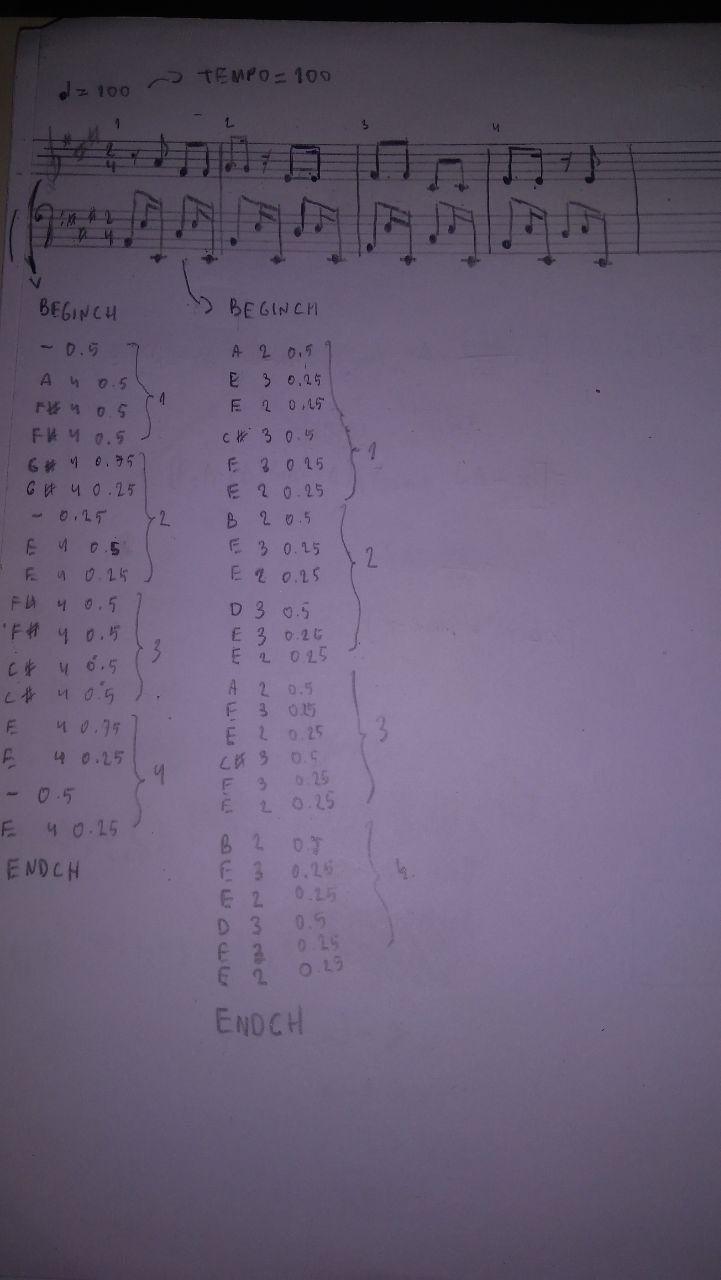
In the next drawing I show the initial measures of Brejeiro, a chorinho (a Brazilian traditional genre), composed by Ernesto Nazareth (if you have never head it, check it out on Spotify), written as a sheet music and being transcribed to that format:
Output
The output are G-Code commands. More specifically, I’m only generating G0 (Linear Move). They have the following syntax:
G0 X<X position> Y<Y position> Z<Z position> F<speed>
For example, G0 X10 Y20 Z30 F200 will linearly move the printing nozzle to the
position (10mm, 20mm, 30mm) at a speed of 200mm/min.
How it works
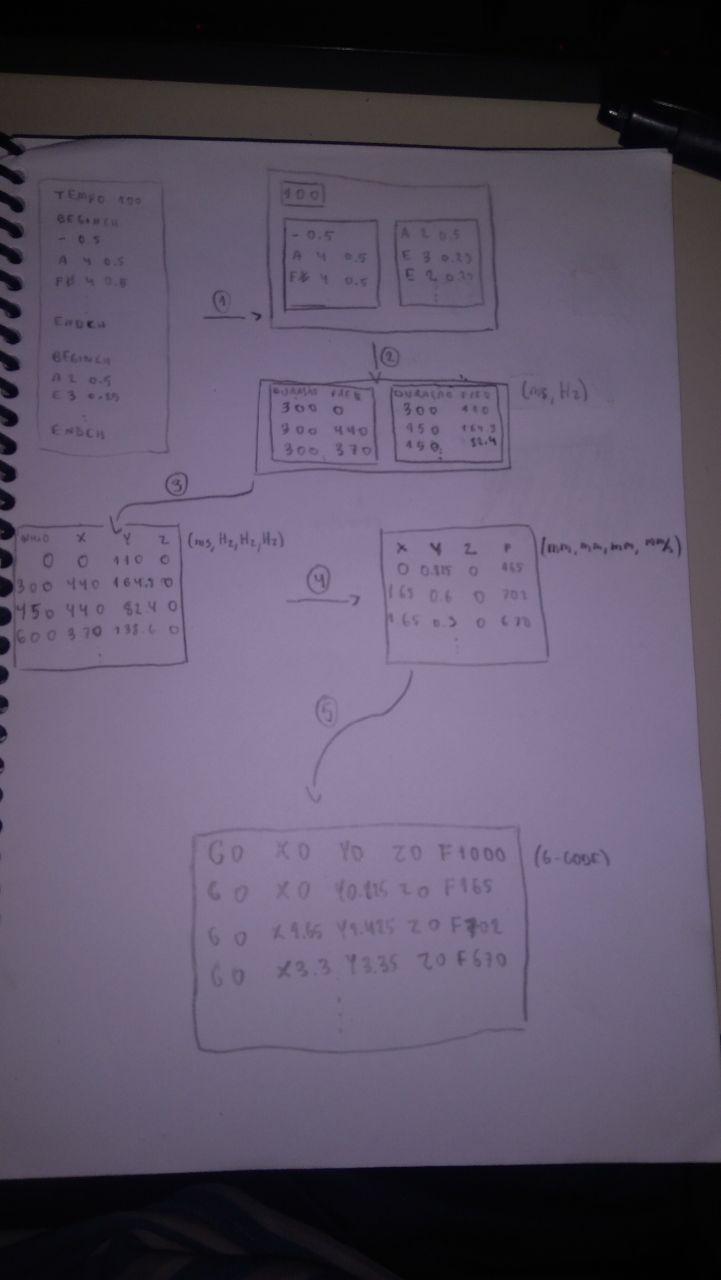
Using the same example, Brejeiro, the conversion will be performed like described in the next picture. The numbers represent the steps of the conversion:
Step 1: parser
I’ll skip it because it is boring… We only need to know that we have a function with this signature:
parseSong :: [String] -> Song
In other words, it receives as parameter a list of Strings and return a
Song , where:
type Hz  = Float
type Sec = Float
type Bpm = Int

data SongAtom = Silence Sec | Note (String, Int, Sec)
type Channel  = [SongAtom]
type Song     = (Bpm, [Channel])
Translating it to English, that means that Hz and Sec are only type synonyms
of Float, and Bpm is a type synonym of Int. Thus, Song is composed by
the song BPM and a list of channels, where each channel is a list of
SongAtoms, that can silences or notes.
Steps 2 and 3: frequency table
Calculating the frequencies
We want to build a table with events showing what frequency will be played by
each axis on each time instant, accordingly to the song parsed in the previous
step. Forgive me for using musical slang, however, I can’t get rid of it to
explain it… Anyway, we want a function freqEventsFromSong, where:
type FreqEvent = (MiliSec, Hz, Hz, Hz)
freqEventsFromSong :: Song -> [FreqEvent]
Ok. First of all, we need to know how to find the frequency of each note. Based on the formula in this page, we can calculate it:
c0 = 16.351597831287418
baseExp = 1.0594630943592953


freq :: SongAtom -> Hz
freq (Silence _) = 0.0
freq (Note n) = mult * c0 * baseExp ** (fromIntegral $ fromFigure figure)
  where (figure, octave, _) = n
        mult = fromIntegral $ ((2 :: Int) ^ octave)
WHAAAT? Well, the frequency of the silence is obviously 0Hz, so, we can hardcode
it. c0 is the frequency of C 0 (check it on the page that I mentioned
before), and it will be used to calculate the frequencies of the other
notes. mult is the octave multiplier: due to the fact that the frequency of
each note is the double of the frequency of the lower octave, that multiplier
will be 2 ^ octave.
fromFigure is a function with the following signature:
fromFigure :: String -> Int`
I’m not going to detail its implementation, it is enough to know that, given
a note expressed in a string (e. g. A#), it returns how many half-tones it is
far from the C in the same octave (in the example of A#, 10). baseExp is the
ratio between the frequency of a note and the frequency of the note one
half-tone below, that is 2^(1/12).
Joining the two things, we can calculate the frequency of the note by mult * c0 *
(baseExp ^ (fromFigure <figure>)).
Calculating the duration of the notes
We calculate the duration of the notes using the following function:
period :: Int -> Float -> Sec
period bpm beats = 60 * beats / (fromIntegral bpm)
In other words, it is a Rule of Three: if it does bpm beats in 60 seconds, how
many seconds does it take to do beats beats?
Joining the three channels into a single table
Once calculated the durations and the frequencies of each note or silence of
each channel, we need to join the information of the three channels in only one
table, in the format described in the beginning of this step (a table of
FreqEvents).
By now, we have 3 tables, each one for a channel, where the columns are
(Duration, Frequency). How can we know when each note will start? It’s simple:
as they are sequential on each channel, the beginning of each note is equal to
the sum of the duration of all the previous notes.
Now, we can join those three tables into a new one where each entry of the table
represents when there’s a change of frequency in one of the channels, and it
contains the new frequency for channel that changed, and the frequency of the
other channels that remain unchanged. This way, we can achieve the expected
result of freqEventsFromSong.
Step 4: Position and speed changes
In this step, we want to take the output of the previous step and use it to
calculate how many steps each axis should move in order to play the notes and
the speed of that movement. In other words, it’s this function
fromFreqEvents:
type MM       = Float
type MM_s     = Float
type Movement = (MM, MM, MM, MM_s)

fromFreqEvents :: Printer -> [FreqEvent] -> [Movement]
where Printer contains information about the printer, [FreqEvent] is a list
of events generated in the previous step and [Movement] is a lista of the
resulting movements.
As I said before, the pitch of each note can be heard due to the frequency of
the movement of the stepper motors. And its duration? Well, it’s easy, we only
need to multiply the frequency by the duration, with p = Δt * f, where p is
the number of steps, Δt is the duration, and f is the frequency. For
example: if we have a 440Hz note playing during 2s, then we need to step 880
time at 440Hz.
And as I said before, we don’t have the control of that directly through G-Code,
however, we can control how many millimeters each axis will move and the
speed of that movement in millimeters per minute. And how can we calculate
that? Well, again, it’s simple: for each axis, the position can be calculated
using the formula Δs = p * (pmm), where p is the number of steps and pmm
is how many steps are required to the axis to move 1mm.
The speed should be calculated for the three axes at the same time. If you
remember physics classes, then you know that the speed of each axis can be
calculated using v = Δs / Δt. However, the speed that we need to provide in
the G-Code is the absolute value of the vector addition of the speed of the
three axes, then the Δs should be the absolute value of the vector addition of
the displacements of the axes. In other words: Δs = sqrt (Δsx² + Δsy² + Δsz²).
Now we only need to convert the speed units, as we are working with millimeters and miliseconds and G-Code works with millimeters per minute.
Step 5: Absolute positioning and G-Code
This is the last step, and the hardest one. So far, we have a table that contains how many millimeters each axis should move, and the speed of the movement. What we want, in G-Code, is the absolute position where the printer will move the nozzle to. In order to build that G-Code we need to be careful that the movements be restricted to the printing space. Otherwise, it won’t work and can be harmful to the printer.
We need a code that does this:
fromRelativeMovements :: Printer -> [Movement] -> GCode
or, in other words, a code that takes as arguments the printer information (what we need here is the limits of each axis) and the list of relative movements mentioned in the previous step. That function returns the resulting G-Code.
The first position is the origin of the sequence of following movements, and it is defined like this:
fstPos = (x0, y0, z0, homeSpeed)
Given a position, we can calculate the next one, recursively. So, having the first position and the list of the following movements, we can calculate the absolute positions like that:
absolutes = foldl nextSafeMovement [fstPos] movements
  where nextSafeMovement l d = l ++ nextSafeMovements printer (last l) d
Or, in English: the application of the function nextSafeMovements, having as
arguments printer (the printer info), an absolute position and the relative
position of the next relative movement returns the next positions that the
printer should move to in order to finish that movement. Well, yeah, it’s a
little bit confusing. But keep in mind that we need to do this because a single
movement may be broken in two or more movements if it exceeds the printer
limits.
Ok, but, what is nextSafeMovement? It is a function with this signature:
nextSafeMovements :: Printer -> Position -> Movement -> [Position]
that is, a function that takes as argument the printer information, the last absolute position, the relative movement that we want to apply, and it returns a list of relative positions.
This function is quite long to be described here, however, we only need to know that:
-
the direction of the movement is the one that moves towards the furthest end of the axis, giving it more room to move;
-
if there’s room enough to only make one movement, then it will be used;
-
otherwise, the movement will be done until the nozzle hits a border. The resulting position and the remaining relative movement will be used as parameters to the same function. That recursive call will be done until there’s no more remaining relative movement;
-
the speed is always the same that was calculated previously for the relative movement, we don’t need to touch it.
Then we have a list of the positions where each axis should move to, and the speed of each of those movements. Those are the parameters of the G0 G-Code, so, we only need to format them as described in the the beginning of this text.
Finally, G-Code
Finally we have the resulting G-Code, that can be loaded in a SD card, or it can be sent to the printer through a software.
Possible next features
- Show the lyrics in the printer display;
- Use the extruder stepper as an extra channel;
- Use the buzzer as an extra channel;
- Add support to Delta and CoreXY printers;
2023 Update
I forgot to add a video showing it working. Here it is:
2023 Update #2
After some requests, I also added support for GuitarPro tabs as input. It was only coded in an afternoon, so, it’s can be very buggy. However, it’s a great improvement, as it is easier to edit than the format that I described above.
This new code works as the parser described in step 1.